
Project · Distortion
EHX™ Big Muff Pi™ Replicas
One board, nine Big Muffs: this kit builds the Triangle, Ram's Head, Violet, late-70s, Civil War, Green and Black Russian, NYC or our own GGG Tuned version, each with its own free schematic and parts list. The complete kit is $55 with every part included; the op-amp Big Muff™ is a separate kit lower on this page.
An Electro-Harmonix™ Big Muff Pi™ Replica known as the BMP. This project covers most of the known transistorized versions of the BMP.
The Big Muff™ OpAmp version can be found at the bottom of this page.
Note that: Trademarks mentioned on this page belong to their owners and NOT to General Guitar Gadgets
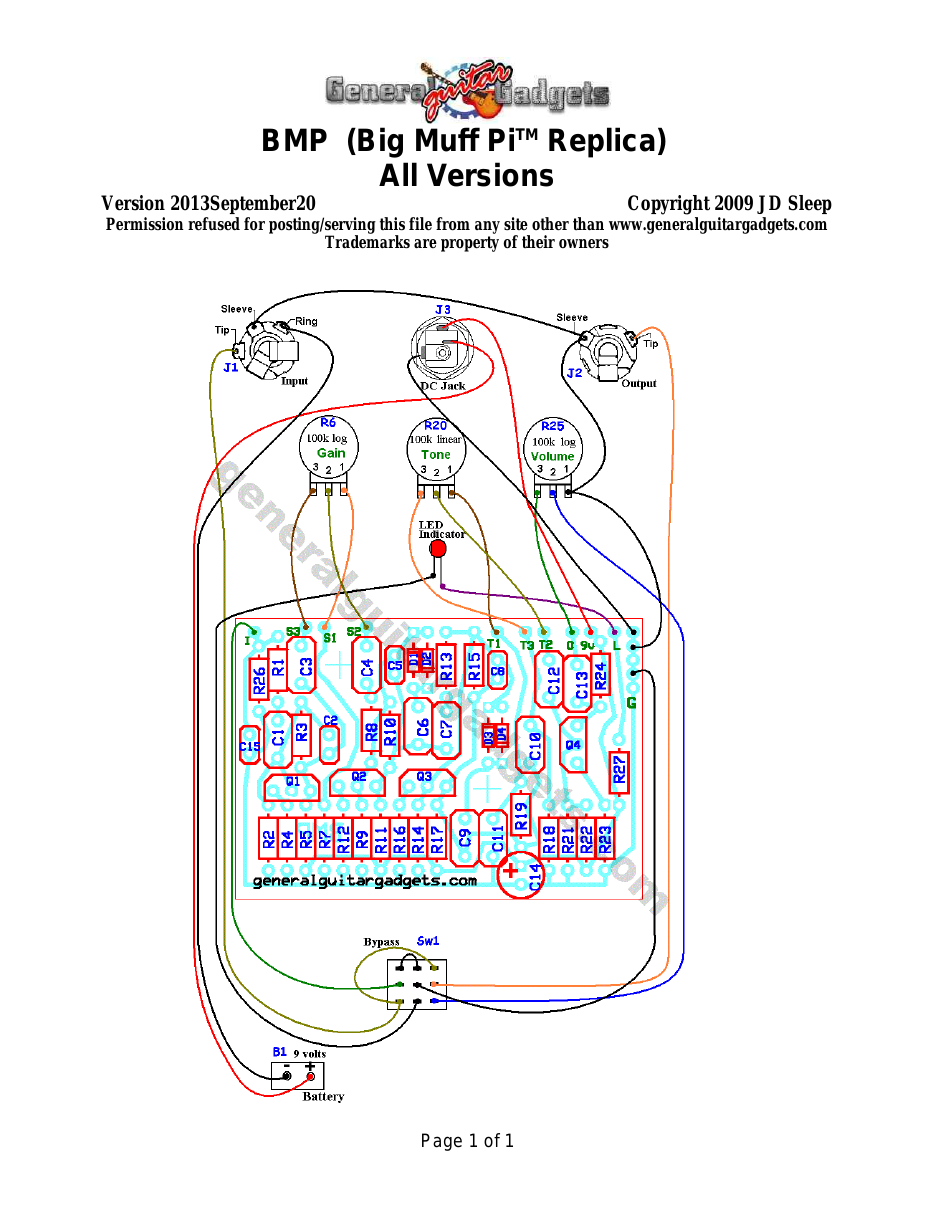
The documents in this first section are shared by all versions. All versions use the same PCB and the same wiring diagram. Parts layouts and schematics for each of the versions are listed as you go down the page.
Project files
Everything you need to build it
BMP Ready-For-Transfer Printed Circuit Board Layout For use only if you are a complete DIY person who wants to etch and drill your own PCB. Otherwise, we recommend you ignore this PCB mask and buy the Ready-to-Solder Printed Circuit Board or Complete Kit from the links below.
OpAmp BMP Ready-For-Transfer Printed Circuit Board Layout For use only if you are a complete DIY person who wants to etch and drill your own PCB. Otherwise, we recommend you ignore this PCB mask and buy the Ready-to-Solder Printed Circuit Board or Complete Kit from the links below.
Schematic
Schematic
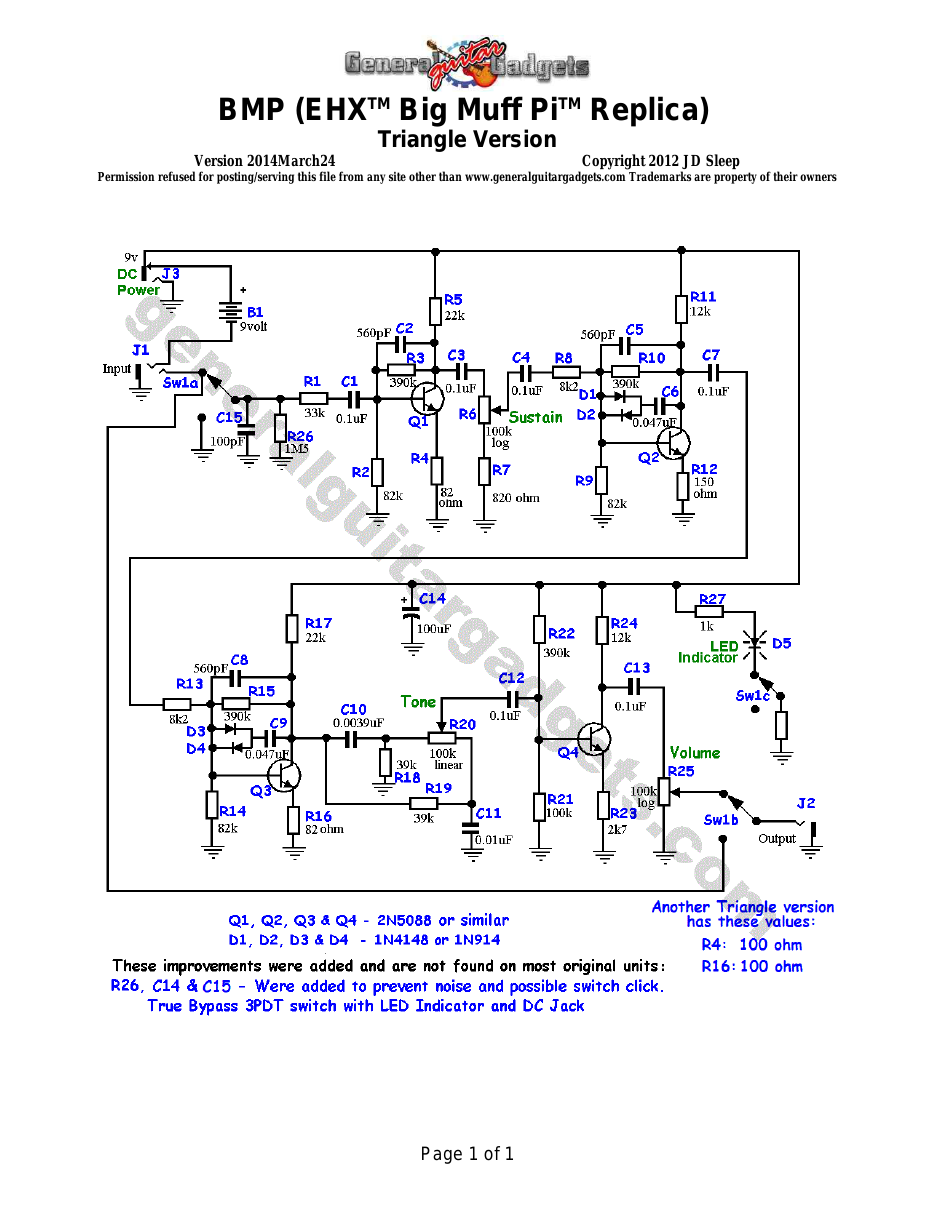
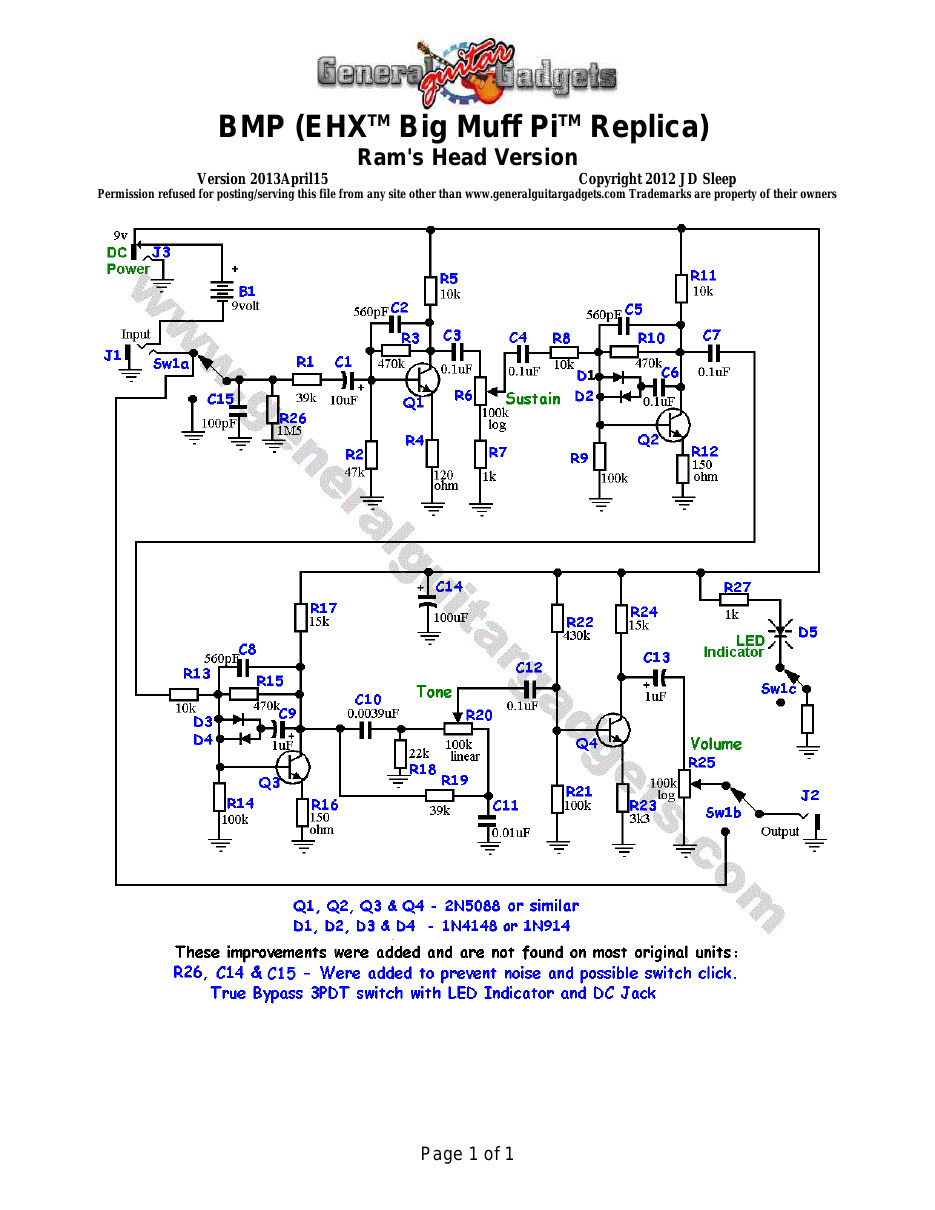
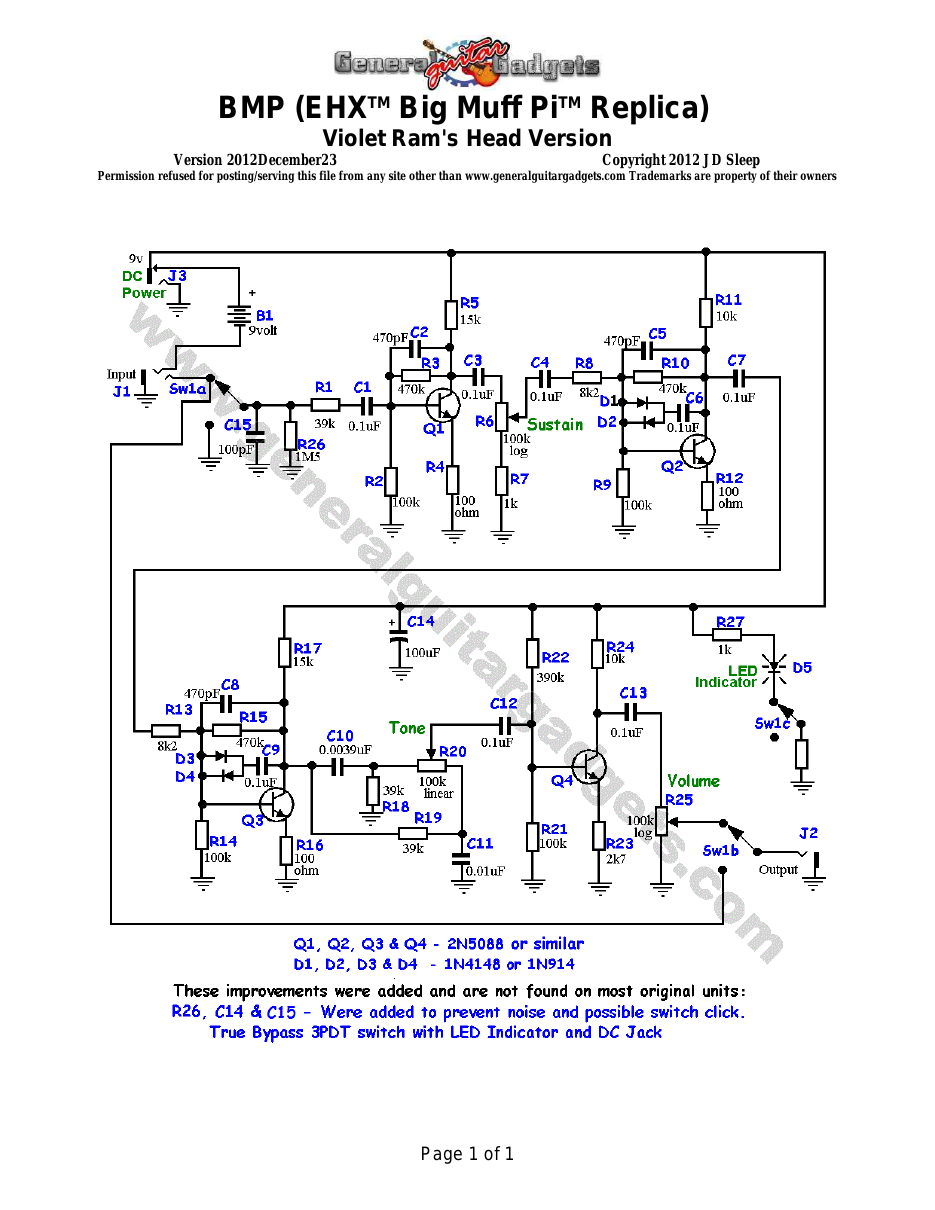
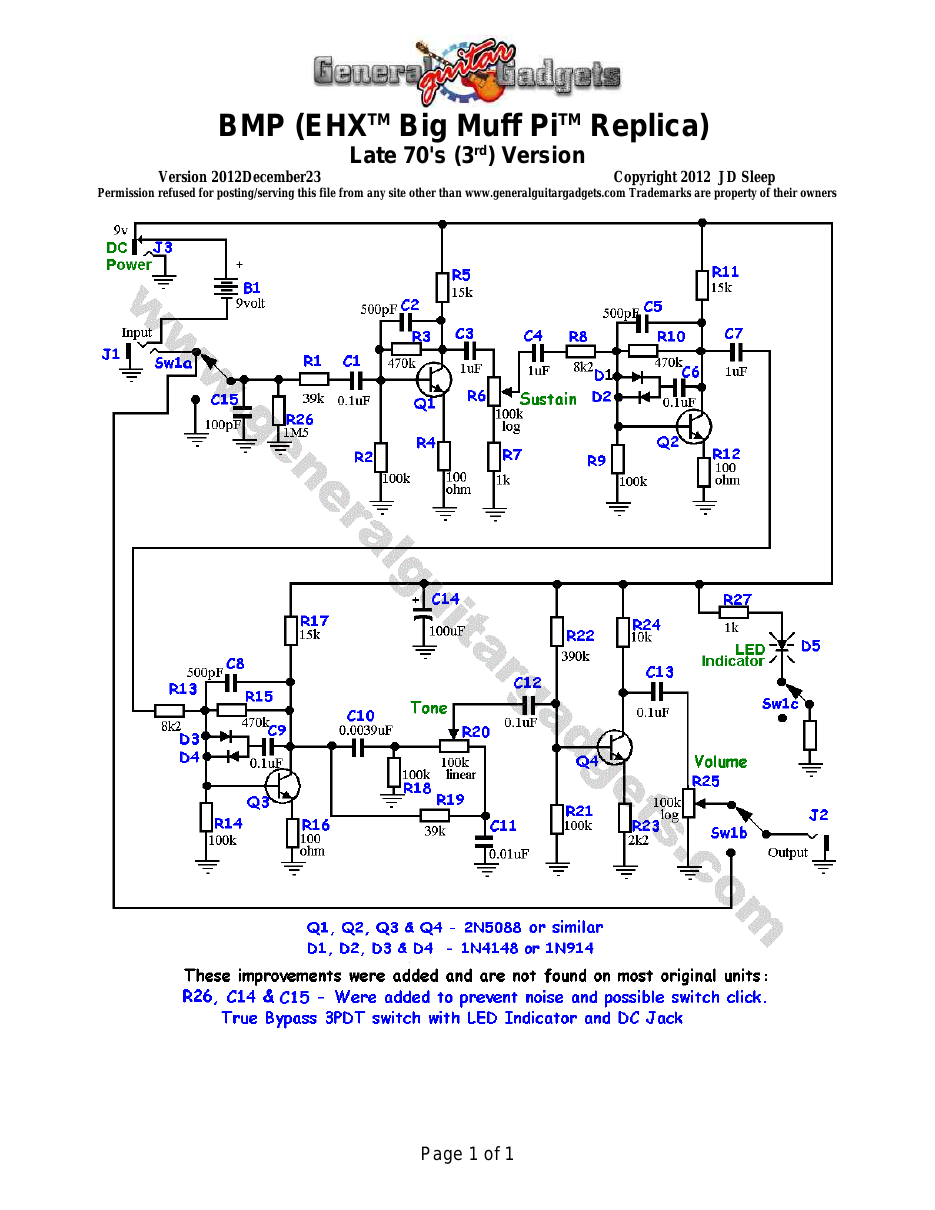
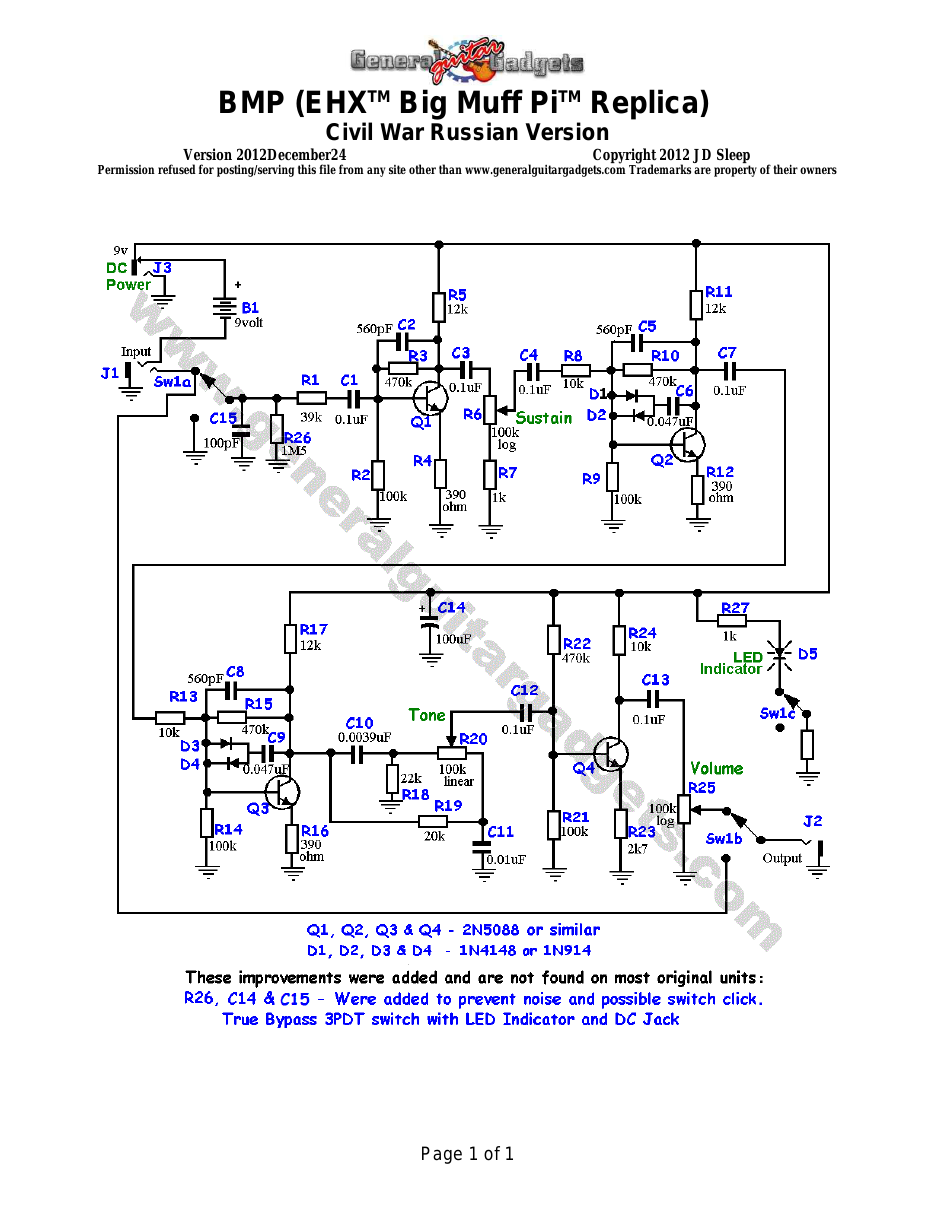
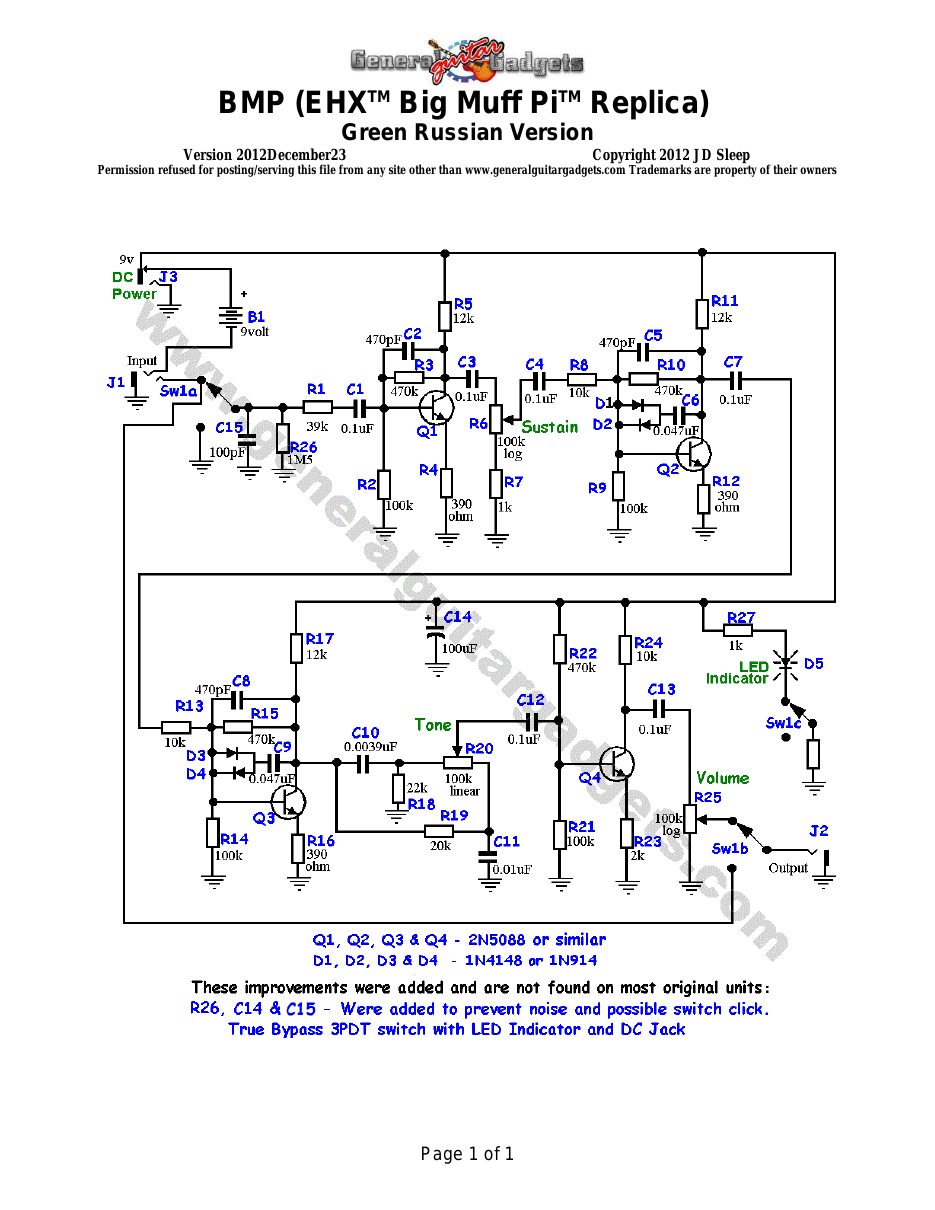
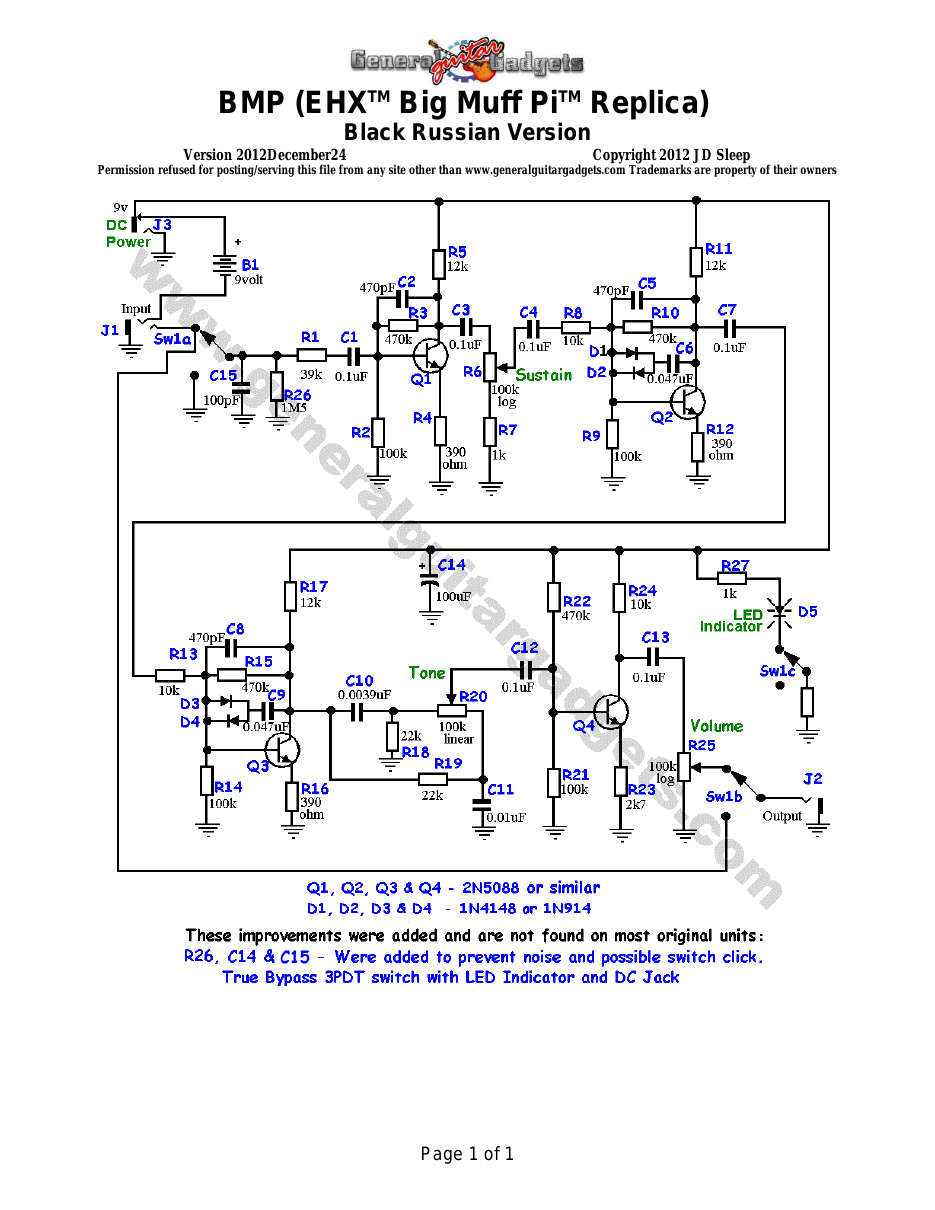
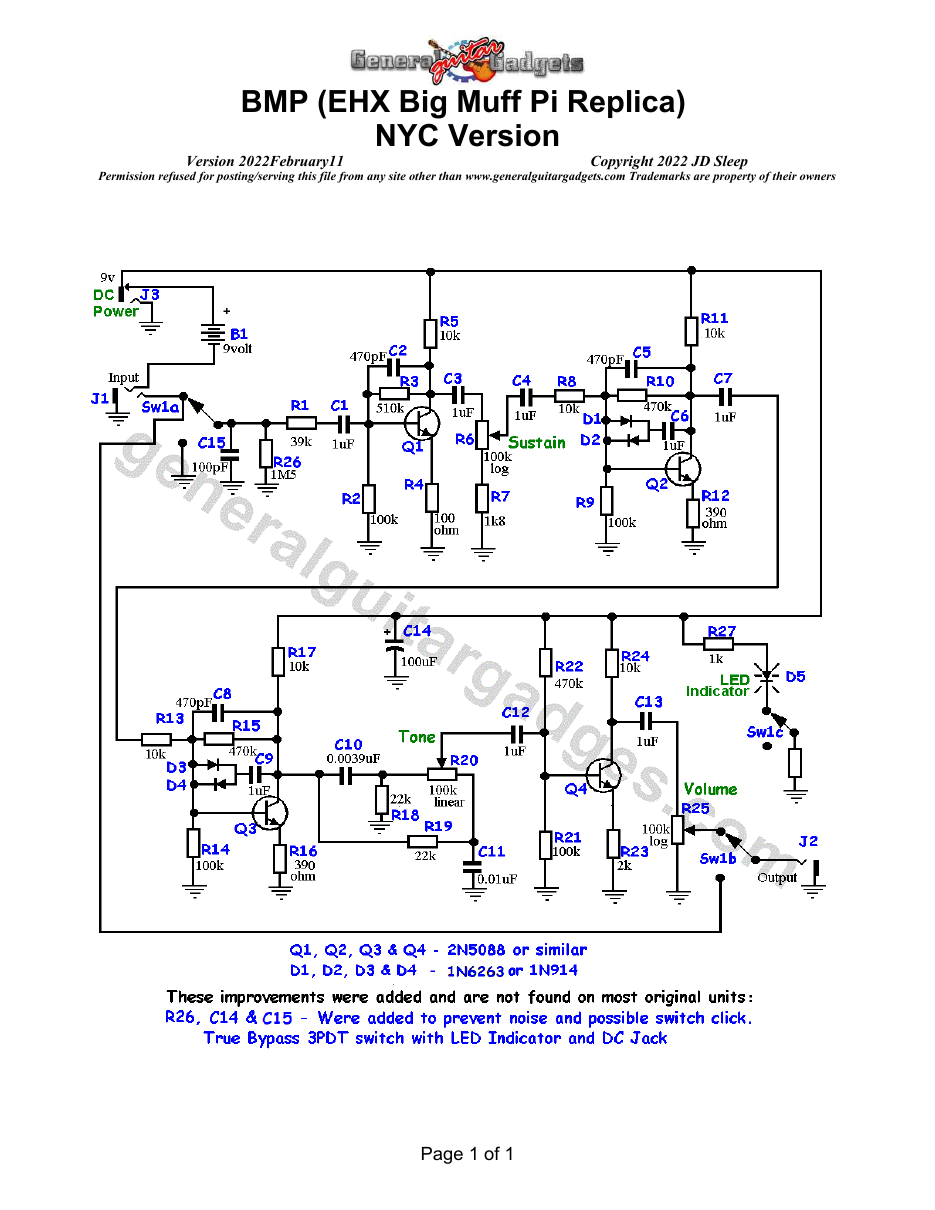
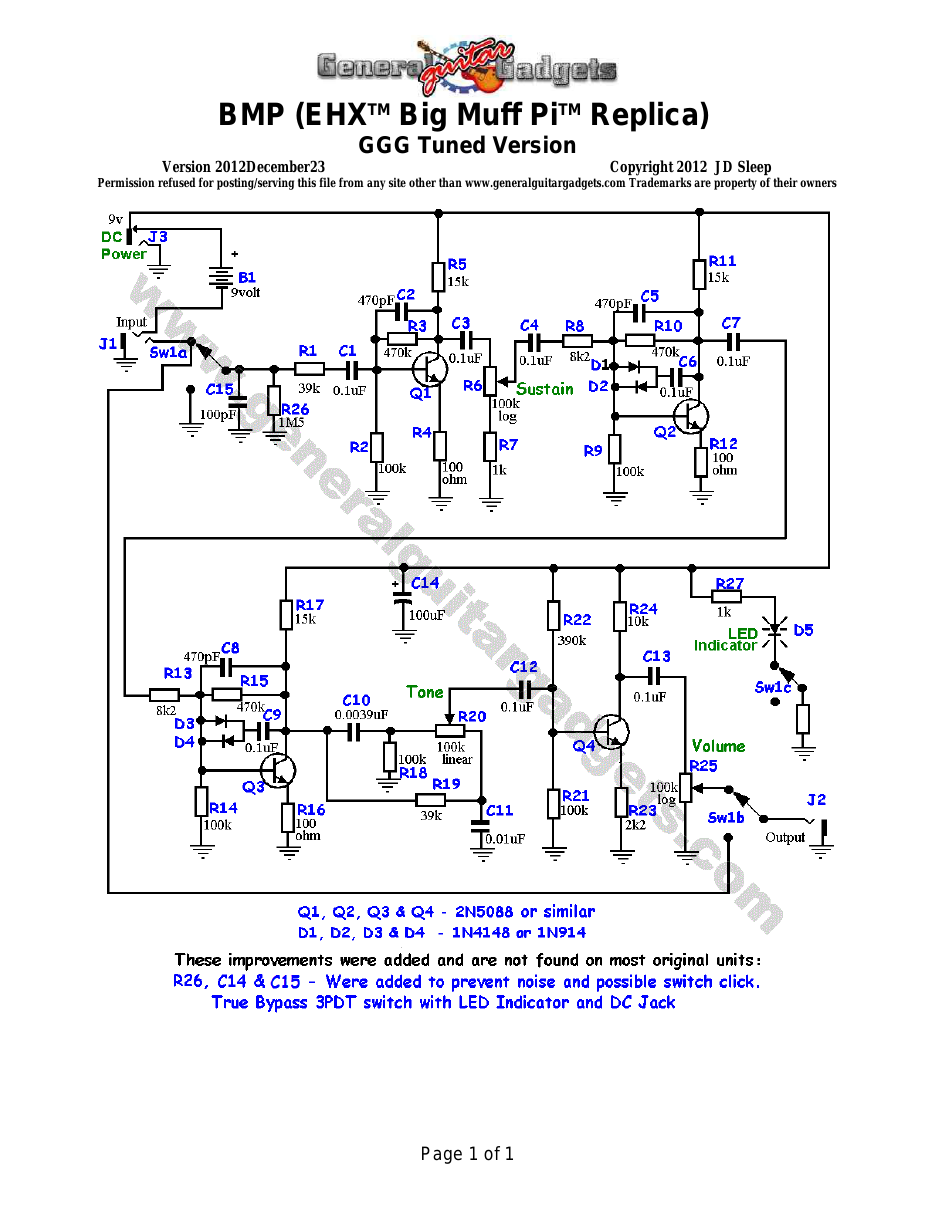
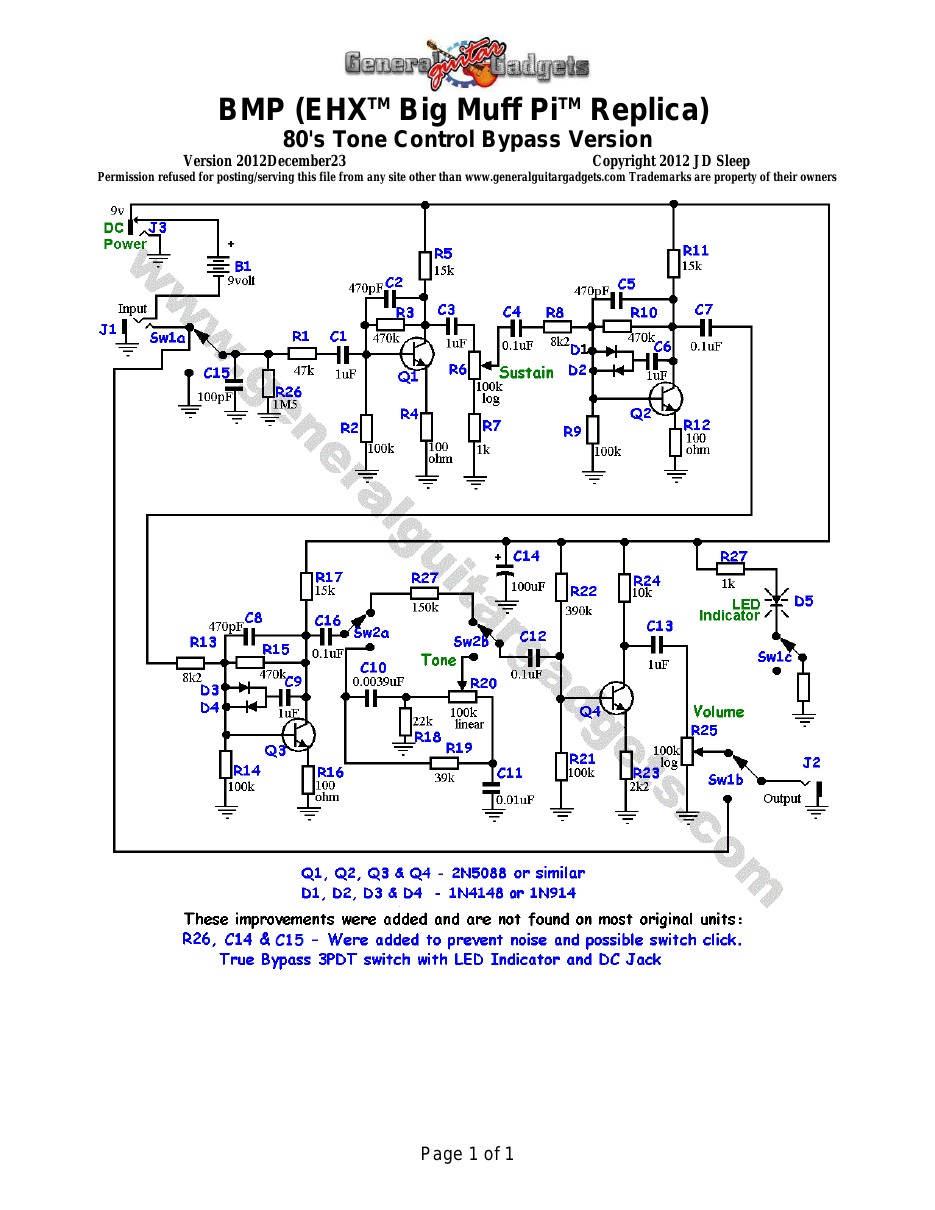
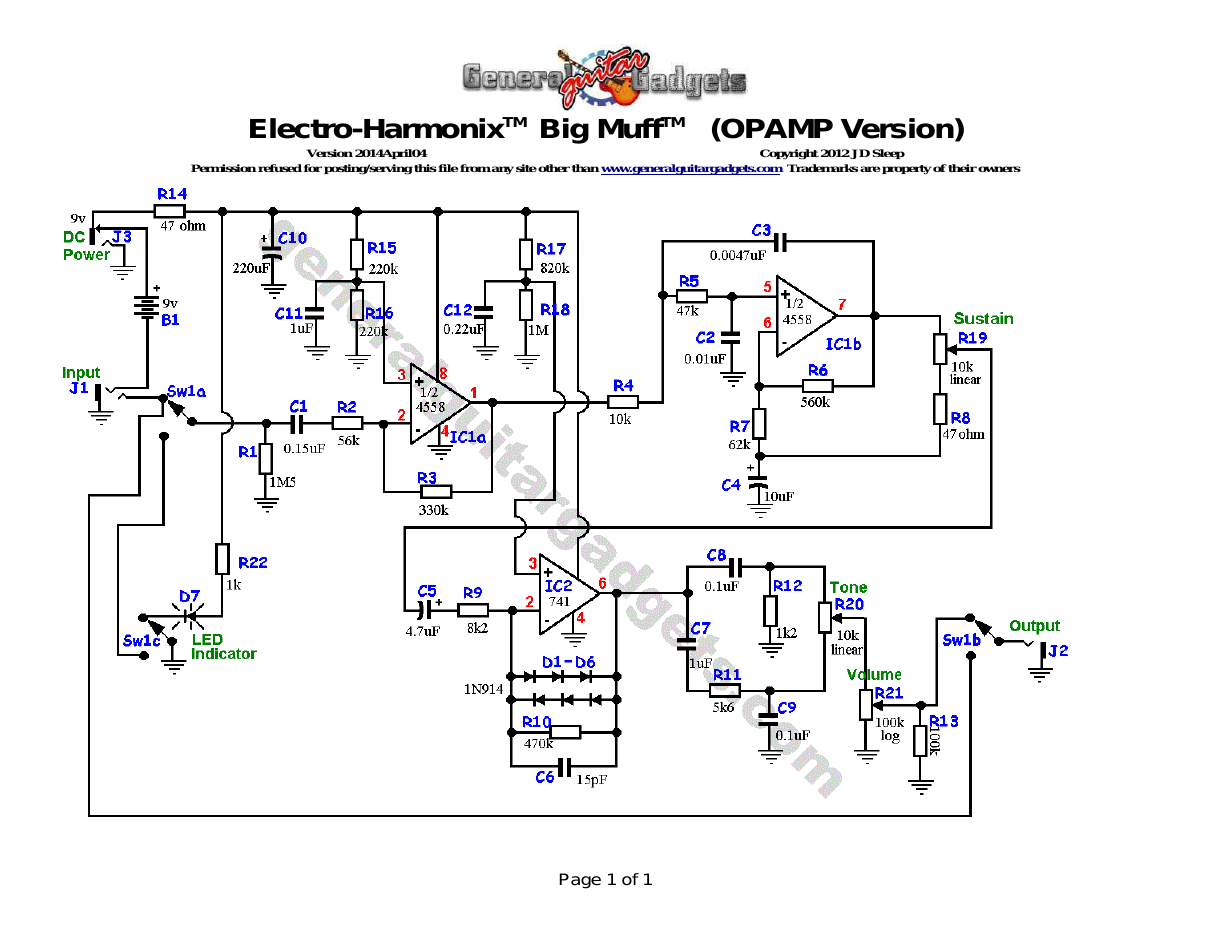
Parts layout
Parts Layout / Wiring Diagram
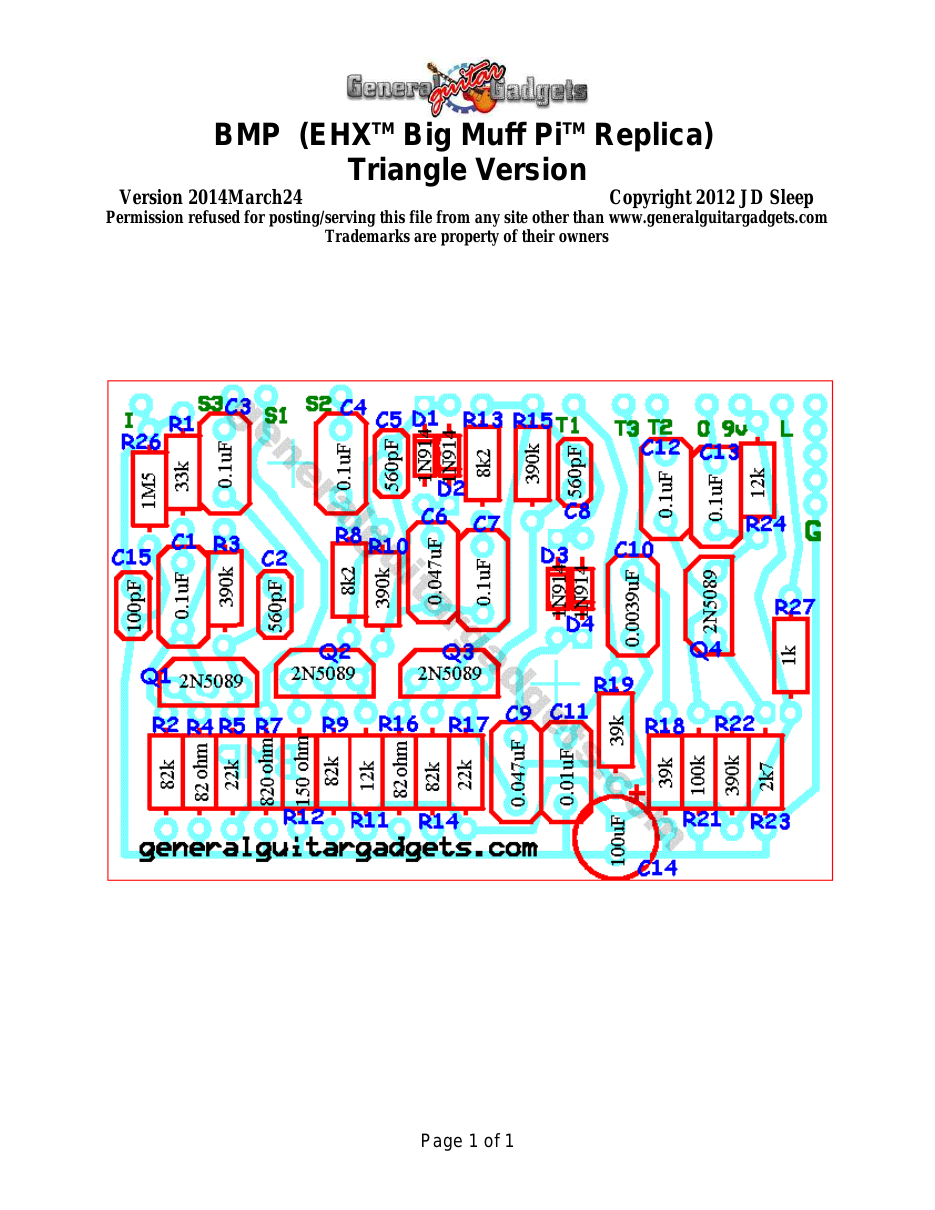
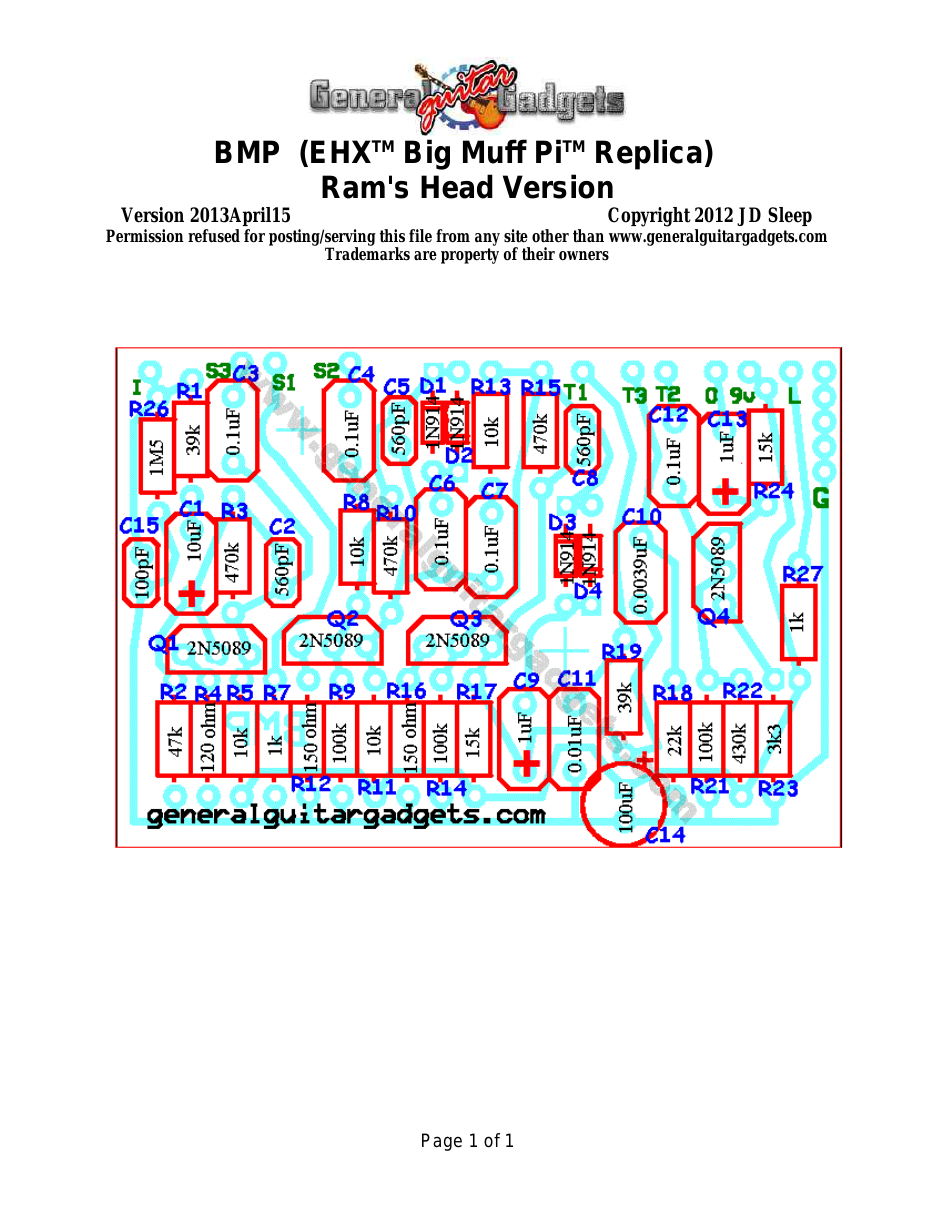
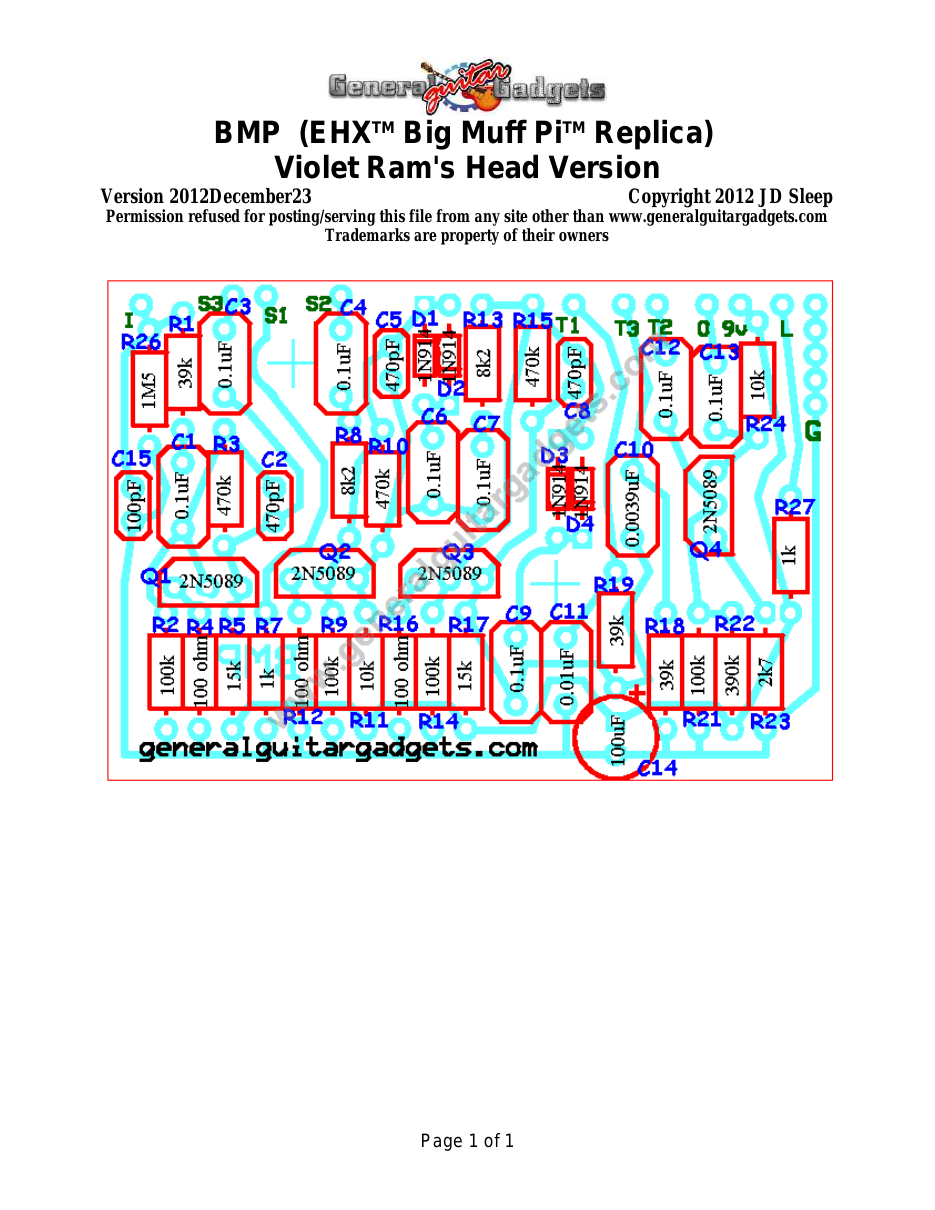
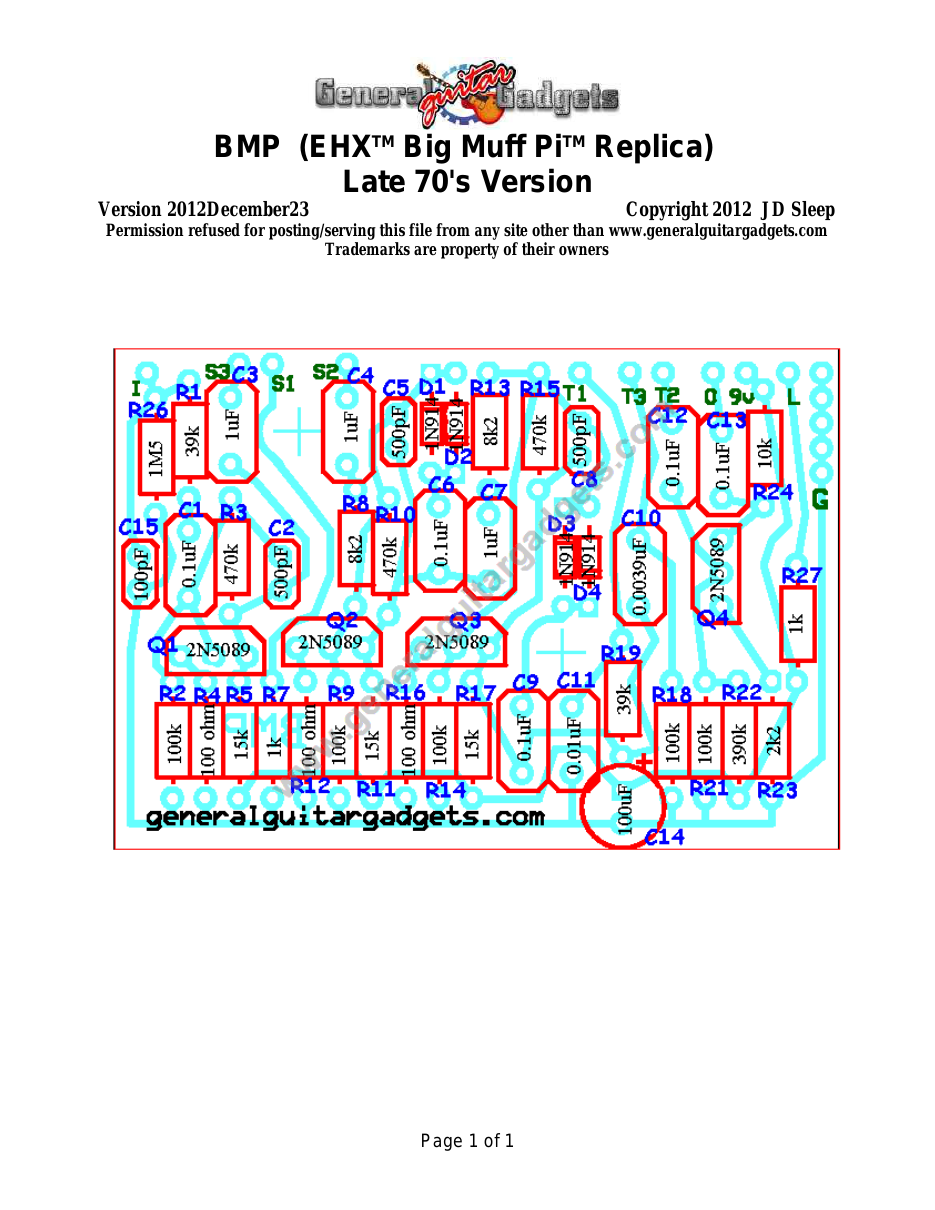
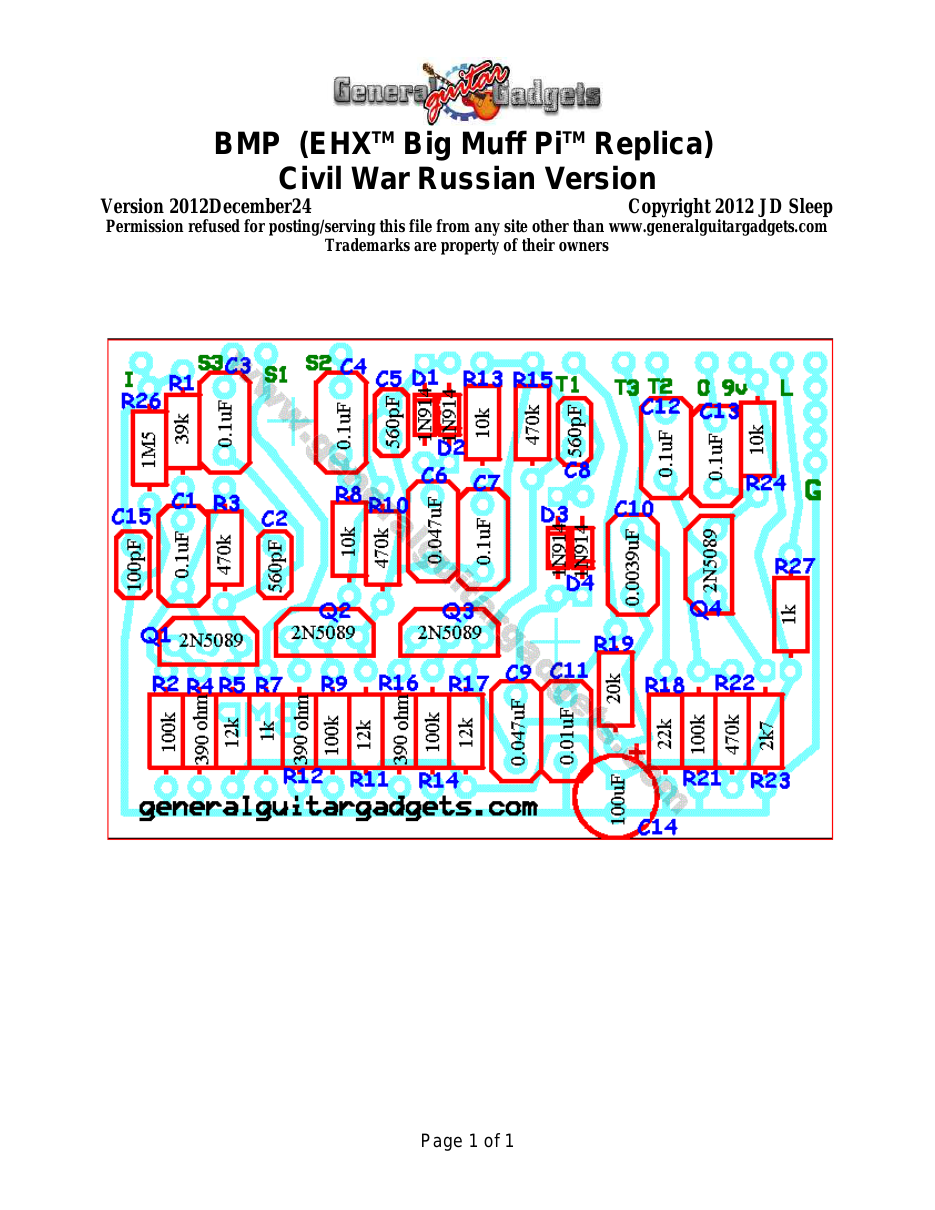
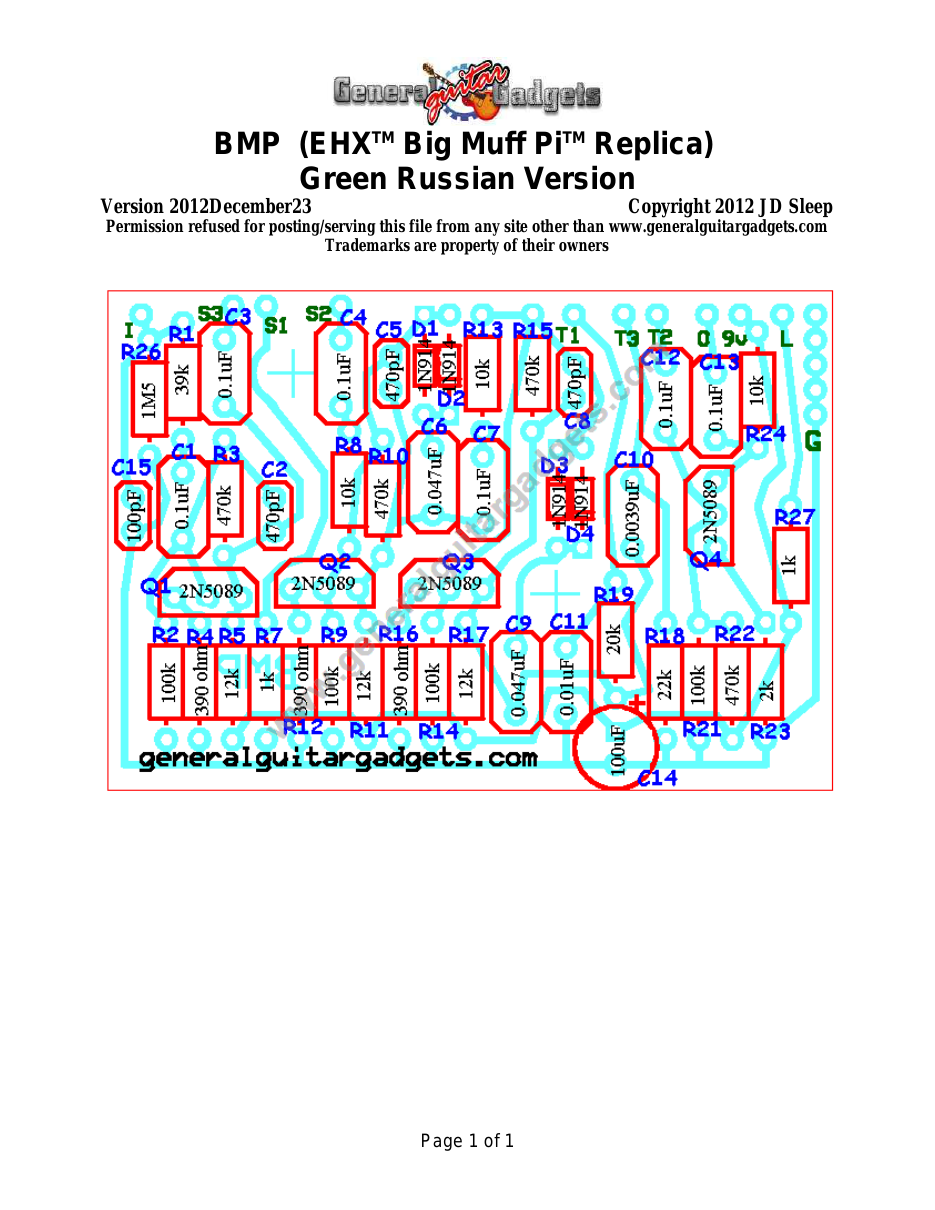
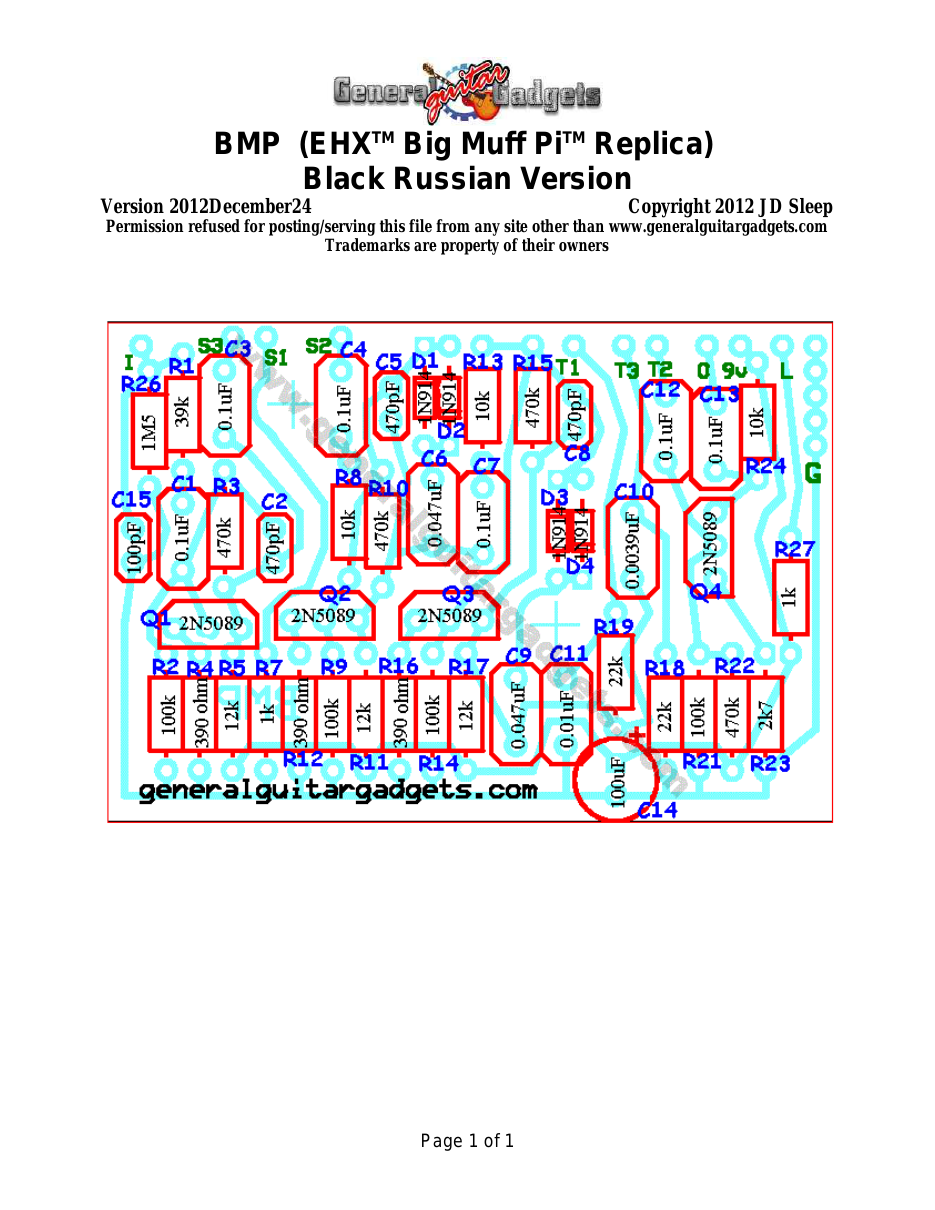
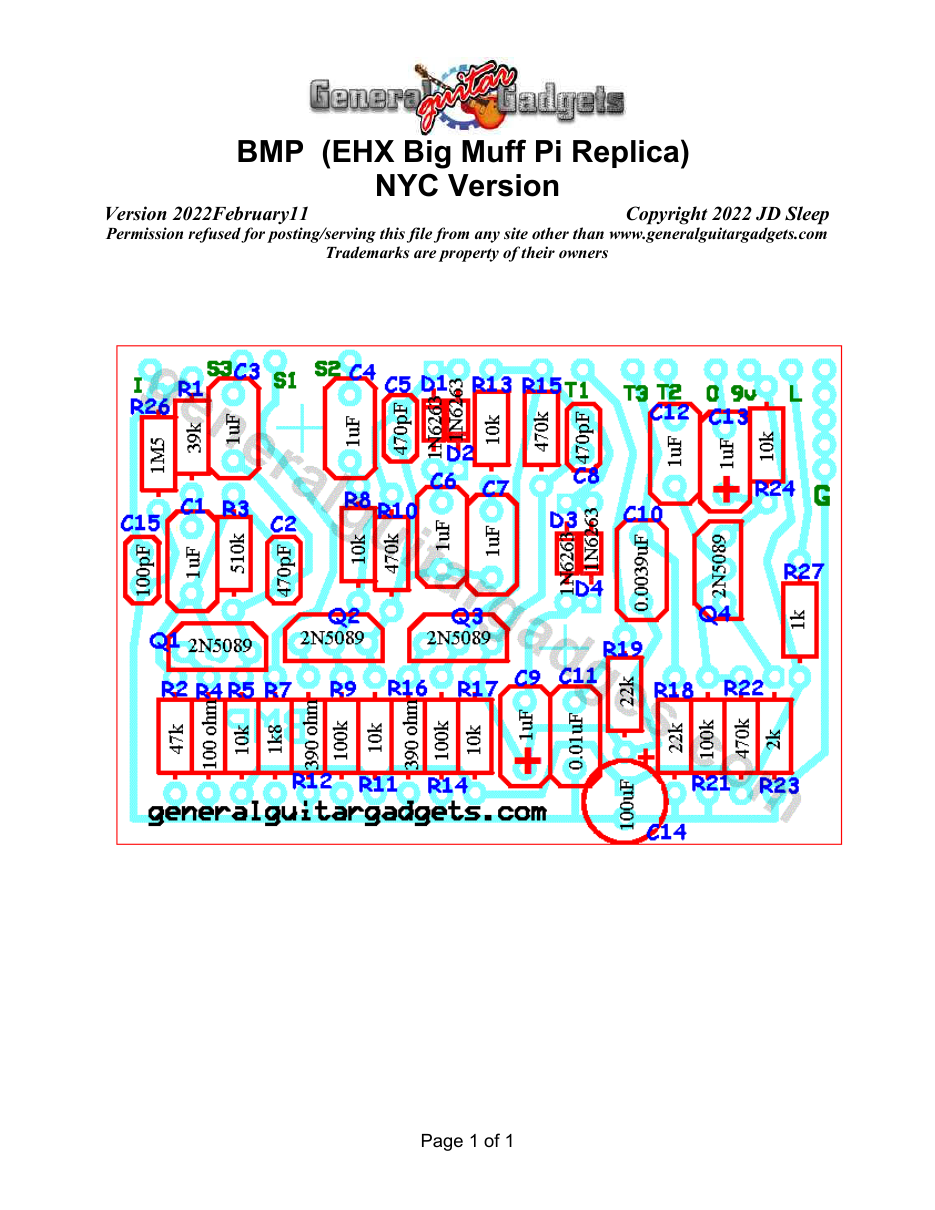
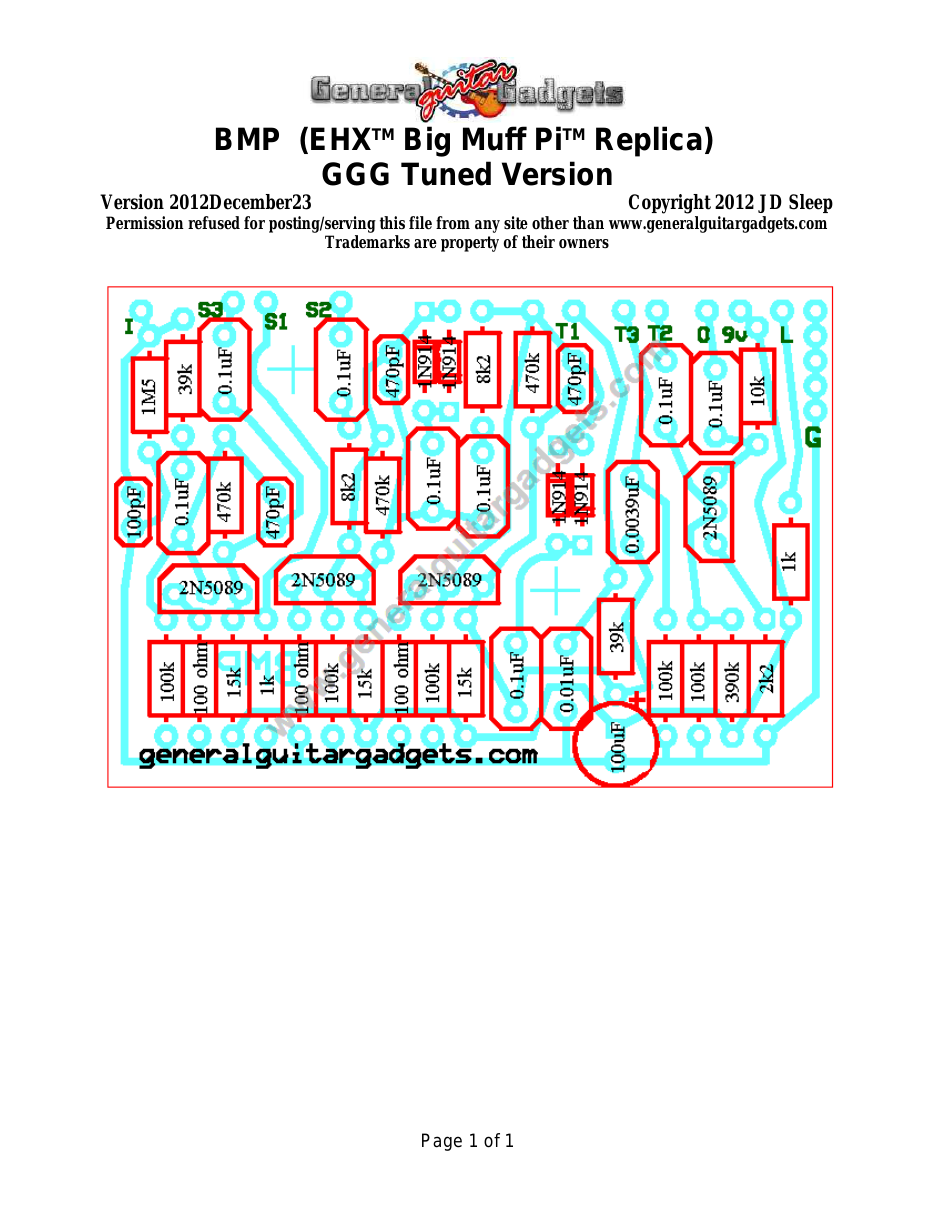
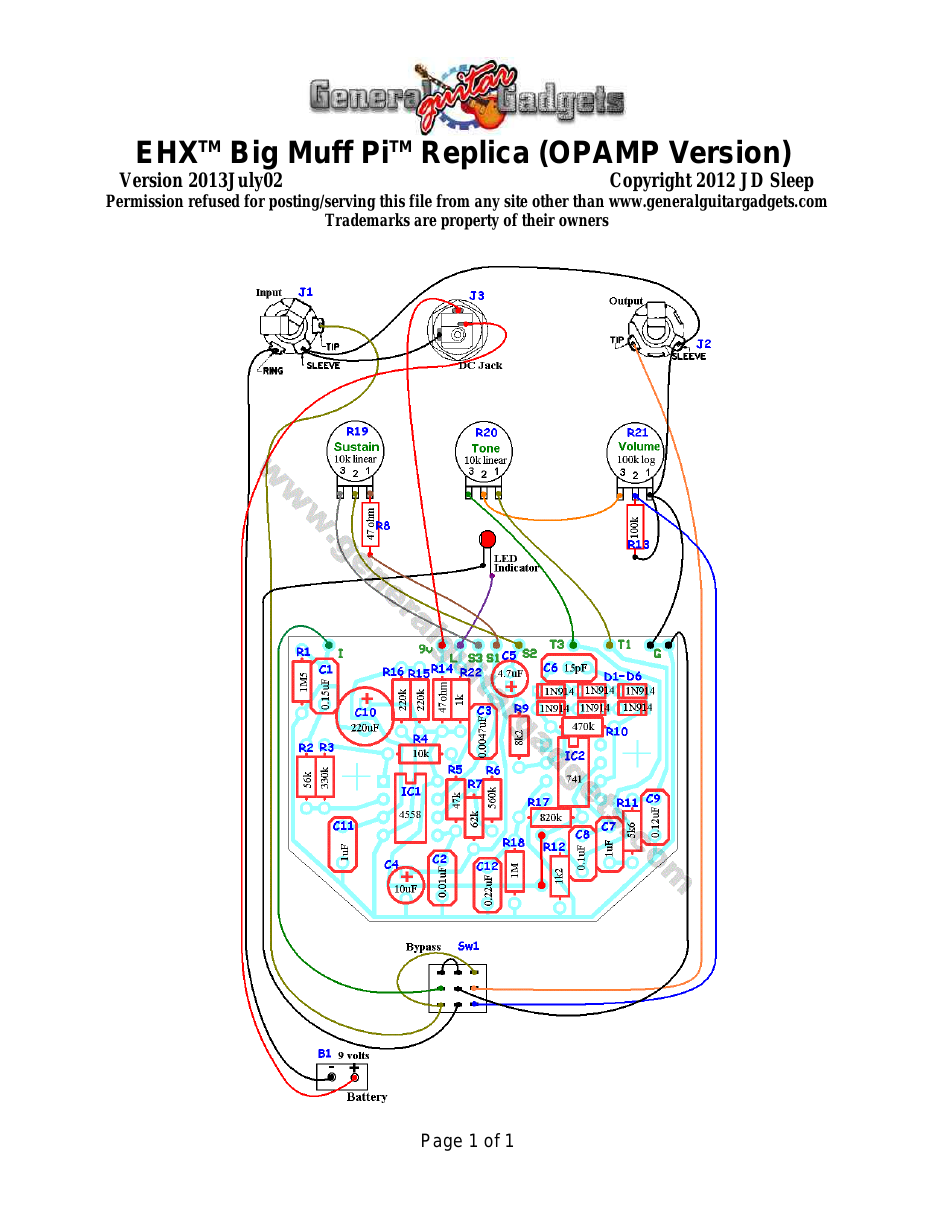
What you will need
Bill of Materials
Version 2014March24 · Copyright 2014 JD Sleep · Permission refused for posting/serving this file from any site other than www.generalguitargadgets.com · Trademarks are property of their owners
Resistors
| Resistor ID | Value | 3-band Marking | 4-band Marking |
|---|---|---|---|
| R1 | 33k | orange-orange-orange | orange-orange-black-red |
| R2 | 82k | gray-red-orange | gray-red-black-red |
| R3 | 390k | orange-white-yellow | orange-white-black-orange |
| R4 | 82 ohm | gray-red-black | gray-red-black-gold |
| R5 | 22k | red-red-orange | red-red-black-red |
| R7 | 820 ohm | gray-red-brown | gray-red-black-black |
| R8 | 8k2 (8.2k) | gray-red-red | gray-red-black-brown |
| R9 | 82k | gray-red-orange | gray-red-black-red |
| R10 | 390k | orange-white-yellow | orange-white-black-orange |
| R11 | 12k | brown-red-orange | brown-red-black-red |
| R12 | 150 ohm | brown-green-brown | brown-green-black-black |
| R13 | 8k2 (8.2k) | gray-red-red | gray-red-black-brown |
| R14 | 82k | gray-red-orange | gray-red-black-red |
| R15 | 390k | orange-white-yellow | orange-white-black-orange |
| R16 | 82 ohm | gray-red-black | gray-red-black-gold |
| R17 | 22k | red-red-orange | red-red-black-red |
| R18 | 39k | orange-white-orange | orange-white-black-red |
| R19 | 39k | orange-white-orange | orange-white-black-red |
| R21 | 100k | brown-black-yellow | brown-black-black-orange |
| R22 | 390k | orange-white-yellow | orange-white-black-orange |
| R23 | 2k7 (2.7k) | red-violet-red | red-violet-black-brown |
| R24 | 12k | brown-red-orange | brown-red-black-red |
| R26 | 1M5 (1.5M) | brown-green-green | brown-green-black-yellow |
| R27 | 1k | brown-black-red | brown-black-black-brown |
Capacitors
| Capacitor ID | Value | Type | Possible Marking |
|---|---|---|---|
| C1 | 0.1µF | Film | 104 |
| C2 | 560pF | Ceramic or Film | 561 |
| C3 | 0.1µF | Film | 104 |
| C4 | 0.1µF | Film | 104 |
| C5 | 560pF | Ceramic or Film | 561 |
| C6 | 0.047µF | Film | 473 |
| C7 | 0.1µF | Film | 104 |
| C8 | 560pF | Ceramic or Film | 561 |
| C9 | 0.047µF | Film | 473 |
| C10 | 0.0039µF | Ceramic or Film | 392 or 3n9 |
| C11 | 0.01µF | Film | 103 |
| C12 | 0.1µF | Film | 104 |
| C13 | 0.1µF | Film | 104 |
| C14 | 100µF | Aluminum Electrolytic | 100µF |
| C15 | 100pF | Ceramic or Film | 101 (or100pF) |
Potentiometers
| Part ID | Value | Type |
|---|---|---|
| R6 - Sustain Control | 100k | Log (or Audio) Taper |
| R20 - Tone Control | 100k | Linear Taper |
| R25 - Volume Control | 100k | Log (or Audio) Taper |
Other
| Part ID | Part Name |
|---|---|
| D1 | 1N914 |
| D2 | 1N914 |
| D3 | 1N914 |
| D4 | 1N914 |
| D5 | LED |
| Q1 | NPN bipolar junction transistor |
| Q2 | NPN bipolar junction transistor |
| Q3 | NPN bipolar junction transistor |
| Q4 | NPN bipolar junction transistor |
| J1 | Stereo quarter-inch jack |
| J2 | Mono quarter-inch jack |
| J3 | DC Jack |
| B1 | 9 volt battery (not included in the Kit) |
| Sw1 | Heavy Duty 3PDT foot switch 9v battery snap, Printed Circuit Board, 24 gauge stranded wire, Enclosure, Knobs |
Examples of other NPN bipolar junction transistors: ● 2N5088 (original) ● 2N5089 ● 2N3904 ● 2N4401 ● many others
Kits are supplied with 2N5089 or 2N5088
How to build it
Instructions
Version 2011September30 · Copyright 2007 JD Sleep · Permission refused for posting/serving this file from any site other than www.generalguitargadgets.com · Trademarks are property of their owners
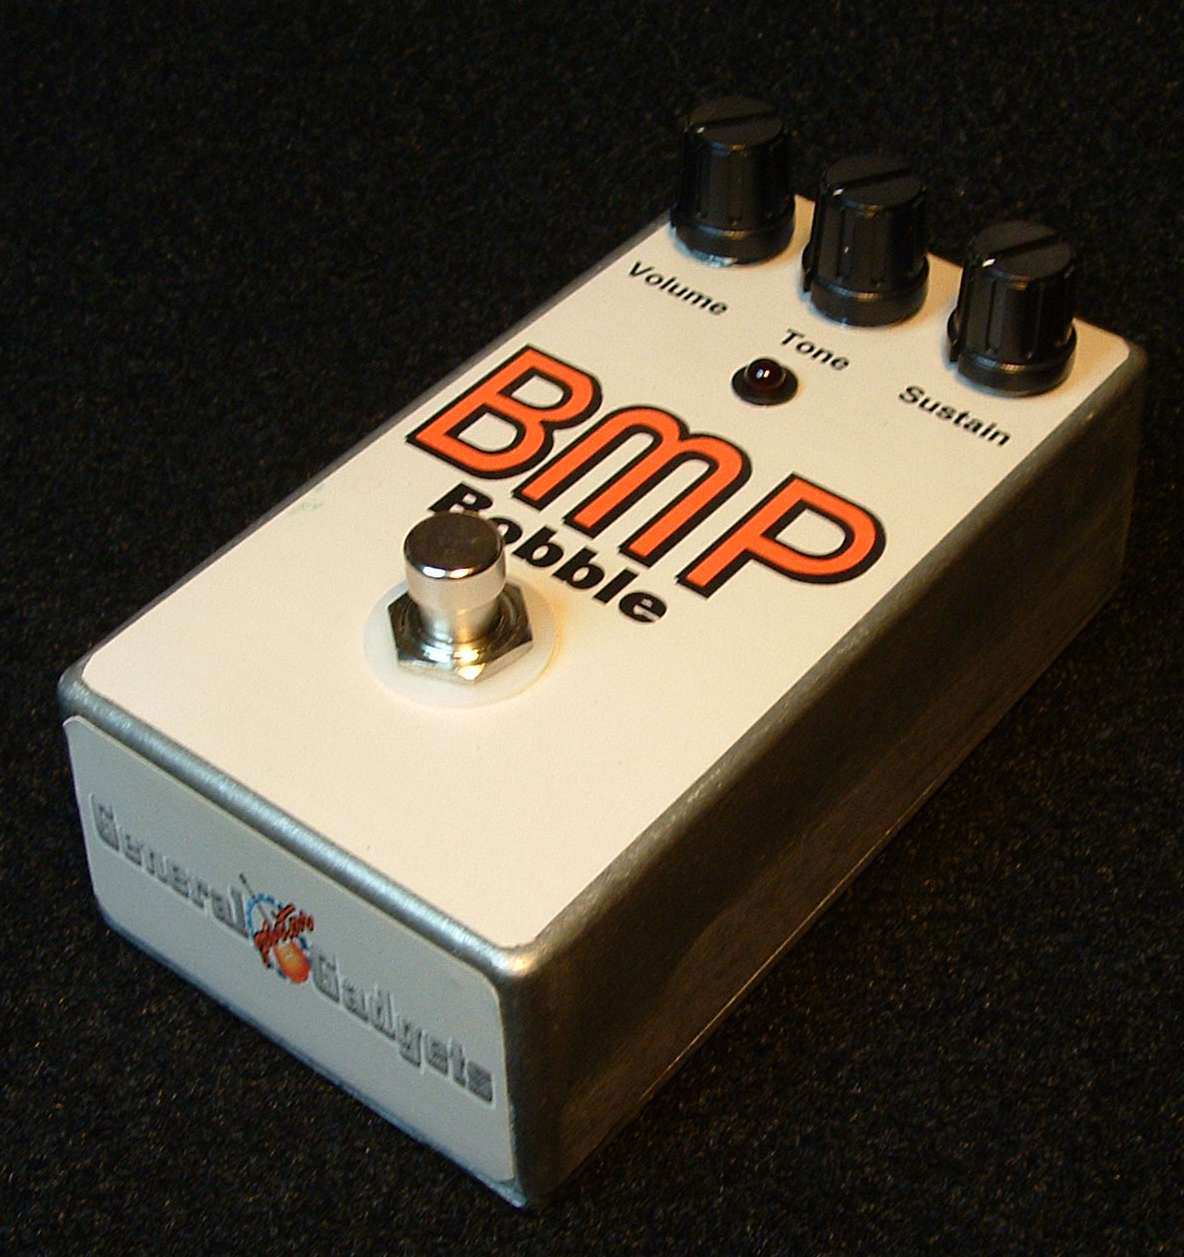
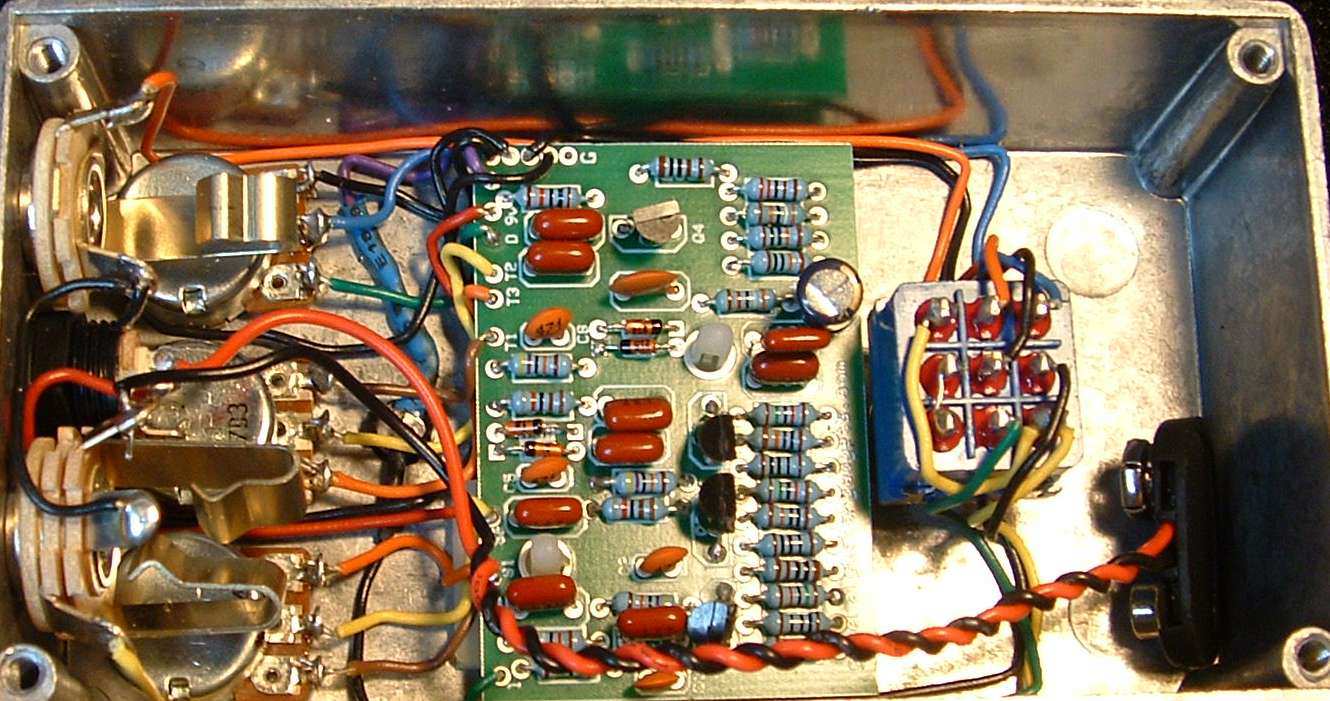
This is a replica of the Electro-Harmonix™ Big Muff Pi™ referred to as BMP in these documents. This is one of the most famous distortion pedals, described by some as violin sounding and very heavy but sustained and smooth distortion. Use the project documents provided, starting with the General Build Instructions. All versions listed on the site use the same wiring diagram. Use the parts layout diagrams to populate the parts for whichever version you are building. Here's an inside view of the unit we built to give you some general ideas if needed.
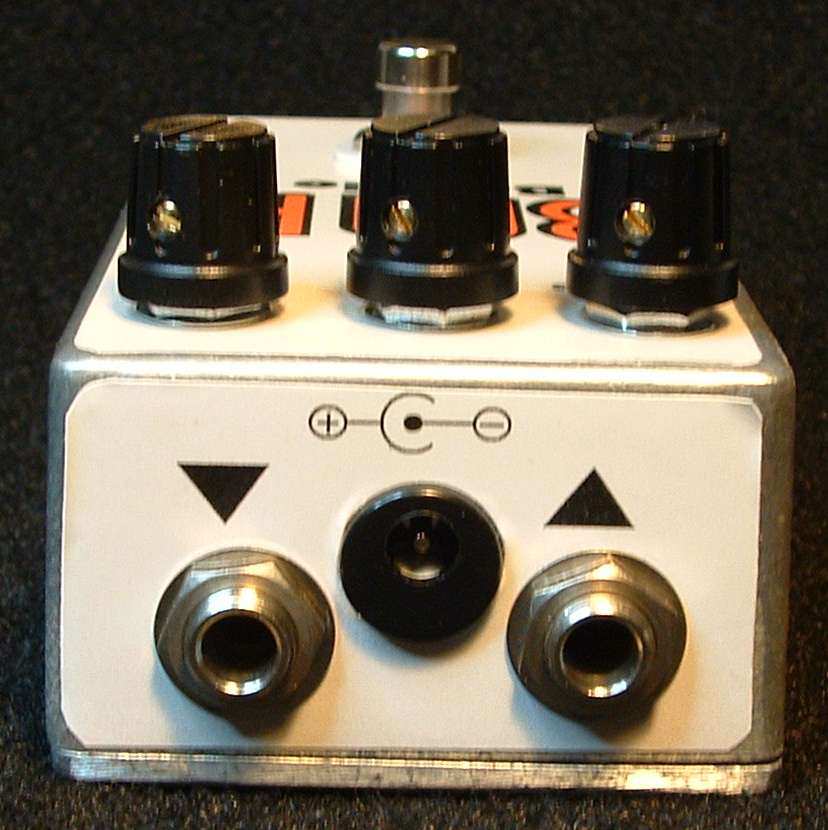
Comments and questions are welcome and can be sent to [email protected] Here is a chart of voltages taken at the transistor pins. This information can be used to help you find and fix problems if your BMP doesn't work when you test it.
Component
Location
9 volt power supply Q1
Q2
Voltage
8.8
Collector
3.9
Base
0.6
Emitter
0.03
Collector
3.8
Base
0.6
Emitter
0.03
Q3
Q4
Collector
3.8
Base
0.6
Emitter
0.03
Collector
4.0
Base
2.5
Emitter
1.8
Questions
Frequently asked questions
Which version should I build?
Green Russian for the thickest, bassiest fuzz; Ram's Head for the classic Gilmour sound; Triangle for the brightest and most cutting; GGG Tuned for a tighter, more overdrive-like Muff that sits well in a band mix.
Can I switch versions later?
The board is the same for all nine; only a handful of resistor and capacitor values change. Many builders socket those parts to try several.
Why NPN transistors when some originals were PNP?
All versions here use NPN transistors with a normal negative-ground supply so the pedal shares a power supply with your other pedals. The sound is unaffected.
How hard is it?
A good first or second build: four transistors, no ICs, no trimmers, and a forgiving circuit. Allow an evening.
Make it your own
Modification Instructions
Version 2012January30 · Copyright 2007 JD Sleep · Permission refused for posting/serving this file from any site other than www.generalguitargadgets.com · Trademarks are property of their owners
This document is intended to give some general ideas about the many, many modifications that can be done to the Big Muff™ PiTM These modification ideas can be applied to any of the commercial units or to the replica project on this site.
General Upgrade Ideas
1. If you are modifying a commercial unit, some of the older units did not have true bypass switching. Rewiring for true bypass is usually a good choice. 2. Use high quality capacitors and metal film (1% tolerance) resistors. This may lower the noise and improve the tone. The quality of capacitors in and of itself may not improve tone, but at the very least good caps are more likely to be consistent and have a closer tolerance to the value you expect from it, which makes fine tuning much easier. 3. Consider socketing the transistors and trying different transistors, until you find a combination that offers the least amount of noise. 2N5089 transistors may produce less noise than 2N5088s. 4. It has been suggested that lower gain transistors may give you less noise and possibly better tone without sacrificing any gain. 5. The Vox™ Suppa Tone Bender™ Project is very similar to the Big Muff™. Its basically the same circuit with a different form of distortion clipping. So, in a way, the Suppa Tone Bender™ is a mod to the Big Muff Pi™. 6. The Jumbo Tone Bender™ and the 3-knob Foxey Lady™ are also similar to the Big Muff™, so check those out for ideas.
Other Simple Ideas
1. As suggested on R.G.'s schematic: replace the 1.0uf caps with 0.1uf caps. Reference numbers on the parts layout are: C1, C3, C4, C7, C13 2. As suggested on R.G.'s schematic: replace the 0.1uf caps with 1.0uf caps Reference numbers on the parts layout are: C6 and C9 3. Here is a very popular, good sounding tone stack mod. Replace the C10 & C11 capacitors with this values: C10 - 0.022uF C11 - 0.1uF
From Mark Hammer
1. Higher value caps in the B-to-C path (e.g. 560 instead of 500pf) can mellow things out a bit 2. Having a slightly lower clipping threshold in the second set of diodes (e.g. by selecting for clipping threshold or using Si for stage 1 and Ge for stage 2) may produce a bit more animation in the sound (change in fuzz quality as the note is held) 3. Using a slightly higher cap value in the diode path (e.g., .22uf instead of .1uf) can introduce more bottom and clip a little more easily. 4. Changing the tone stack component values can introduce different amount of bottom retention
From J. Nage
1. Alter diodes. Try 3 germanium on each side or on one side for asymmetrical clipping (Jack Orman). Changing diodes in second stage may have bigger effect on sound and may cause the distortion character to change as the note is held (Mark Hammer). 2. Reduce coupling caps between stages and input and output caps to .1uF or so (RG Keen). 3. Reduce coupling cap before sustain pot to .01uF to decrease muddiness (??). 4. Use film caps. 5. Increase feedback caps in 3 stages to mellow out the sound. Try 560pF. Decrease for more buzziness. (Mark Hammer) 6. Increase feedback cap before diodes for more bass and gain. Try .22uf to 1uf. (RG Keen). 7. Try different transistors. Lower gain transistors might produce less noise without sacrificing distortion (??). Some possible transistors in order of approximate hFE: MPSA05, 2n3904, 2N5088, 2N5089, and MPSA18. 8. Experiment with tone stack. Check AMZ. Increase .01uF for more bass. Decrease .0047uF for more highs. (Aron Nelson) 9. Experiment with the 100K bias resistor to ground from base of 3rd transistor. Adding this moves bias more toward linear range and may produce a clearer sound to you (Jack Orman). However, leaving it out produces asymmetrical
clipping because one side of the waveform clips before the other due to the misbiased transistor. This is said to produce a warmer distortion that "blossoms" as the note decays. (Aron Nelson). 10. Try class 3 ceramic caps in tone section. Said to produce a "smoother" sound with wider sweet spot in the tone control. (Ed Rembold) 11.To increase sustain try reducing values of coupling resistors (say to 2.2K) or increasing feedback resistors (to 1 to 2M). Or place 2 1M Rs in series with a.01uF cap to ground between them to form voltage divider in feedback loop. (Frank Clark?) 12.Use a JFET (e.g., MPF102, 2N5457, J201, NTE458, etc.) for last stage transistor. Drop the two bias resistors from the base and add a 1M from gate to ground. 13.Experiment with the bias of transistors. The values of the bias resistors reportedly vary among Big Muffs, causing them to sound subtly different (My store-bought Big Muff™ came with values for the collector and emitter resistors that differed by a few K). Want to contribute? If you are happy to share your modification information with other builders, contact us at [email protected]. If the modifications pass our review we will add it to this file for all to enjoy!
More about this project
Notes, sounds and related links
A few words about the "Versions"
Each of these versions came about by someone tracing one of the factory units and creating a schematic of it. These versions are something like general "eras" in the history of the Big Muff Pi™ usually with a name based on the cosmetic features of the outside of the box. The original Electro-Harmonix™ factory had a history of using various components as availability of the components allowed, so there are likely to be some minor variations even within each of the versions. Additional traced units from some of the same versions may expose different transistor types used, or slightly different resistor or capacitor values in various locations of the circuit. We've tried to document as much as we can about versions and variations in this project, we may update as more information comes available to us.
Please note : Although some of the versions of the Big Muff™ had PNP transistor circuits with a positive ground (earth), all of these projects and all kit variations use NPN transistors with a typical negative ground circuit.
Triangle Version
Named after the shape of the placement of the 3 knobs on the stompbox. This is the first BMP made. It had a slider switch to turn the power off and on, a feature that we are glad NOT to include in this project. Most of these produced probably had PNP transistors and the associated power reversals in the circuit.
Ram's Head Version
Named after the old EHX™ logo of a ram's head that was featured on the top of the stompbox. Many of these also contained PNP transistor circuits. This version also had a slider switch to turn the power off and on but it was placed on the front of the stompbox instead of the top like the "triangle version".
Violet Ram's Head Version
Named again after the old EHX™ ram's head logo and the screen printing on the stompbox was of a violet color powder coat.
Late 70's Version
This version doesn't really have a recognizable version name. It is sometimes call the "3rd" version. Cosmetically it looks like the USA reissues with the same red and black screen print art work.
Civil War Russian Version
Built in Russia and featuring a funky font and graphics on the stompbox that must have reminded someone of the kind of print used at the time of the American Civil War.
Green Russian Version
Built in Russia and looking like some sort of army surplus gadget. "Army" green color enclosure and a huge button footswitch. When this version hit the scene, the BMP made a huge comeback in popular music.
Black Russian Version
Built in Russia and sporting a more typical stompbox look (compared to the Green Russian). The black enclosure give it it's name.
NYC Version
Built after EHX™ returned fromn Russia to NYC, thus it's name.
GGG Tuned Version
This is sort of a blend between the Violet Ram's Head version and the Late 70's (3rd) version. More of an overdrive sound to it than the thick fuzz than some versions have.
Note:
GGG was involved with building a pedal by Sanford and Sonny called the Blue Beard bass distortion. This "Tuned Version" is a replica using the same part values as the Blue Beard, but it is
not a Blue Beard
. There may be tone differences due to the PCB layout and kit part selection. This is an excellent distortion for bass or guitar or synth.
Here's a schematic of the early 80's version with a tone control bypass switch. This version is not necessarily covered in this project, but you may be able to work it into the project with a little ingenuity. The tone control bypass might be very useful if you wanted to follow the BMP with the EQ pedal of your choice. This is always a great way to increase the flexibility and fine tune the tone of any distortion pedal.
The following versions can be built with the kit. All parts are included for any of these versions!

Big Muff™ OpAmp Version
This is the Big Muff™ based on opamps instead of transistors. This is a completely different circuit from the other versions. It requires a completely set of components and component layout.


Ready to build? We have the kit.
Buy a BMP Complete Kit. Includes all the parts and materials you need to build one, all for about the price you would pay for a PCB and parts.

Would you like a Ready to Solder Circuit Board for this project? Note: If you buy the kit, the Ready-to-Solder Circuit Board (RTS PCB) is included in the kit. You do not need to purchase this RTS PCB if you buy the kit.
Buy a BMP Opamp Version Complete Kit. Includes all the parts and materials you need to build one, all for about the price you would pay for a PCB and parts.
Would you like a Ready to Solder Opamp version Circuit Board for this project? Note: If you buy the kit, the Ready-to-Solder Circuit Board (RTS PCB) is included in the kit. You do not need to purchase this RTS PCB if you buy the kit.