
Project · Bass
Krampus Bass OverDrive
The Krampus is a very cool bass OverDrive by J. Michael Pedals. It is based on the Tube Screamer™ OverDrive, but tuned for bass.
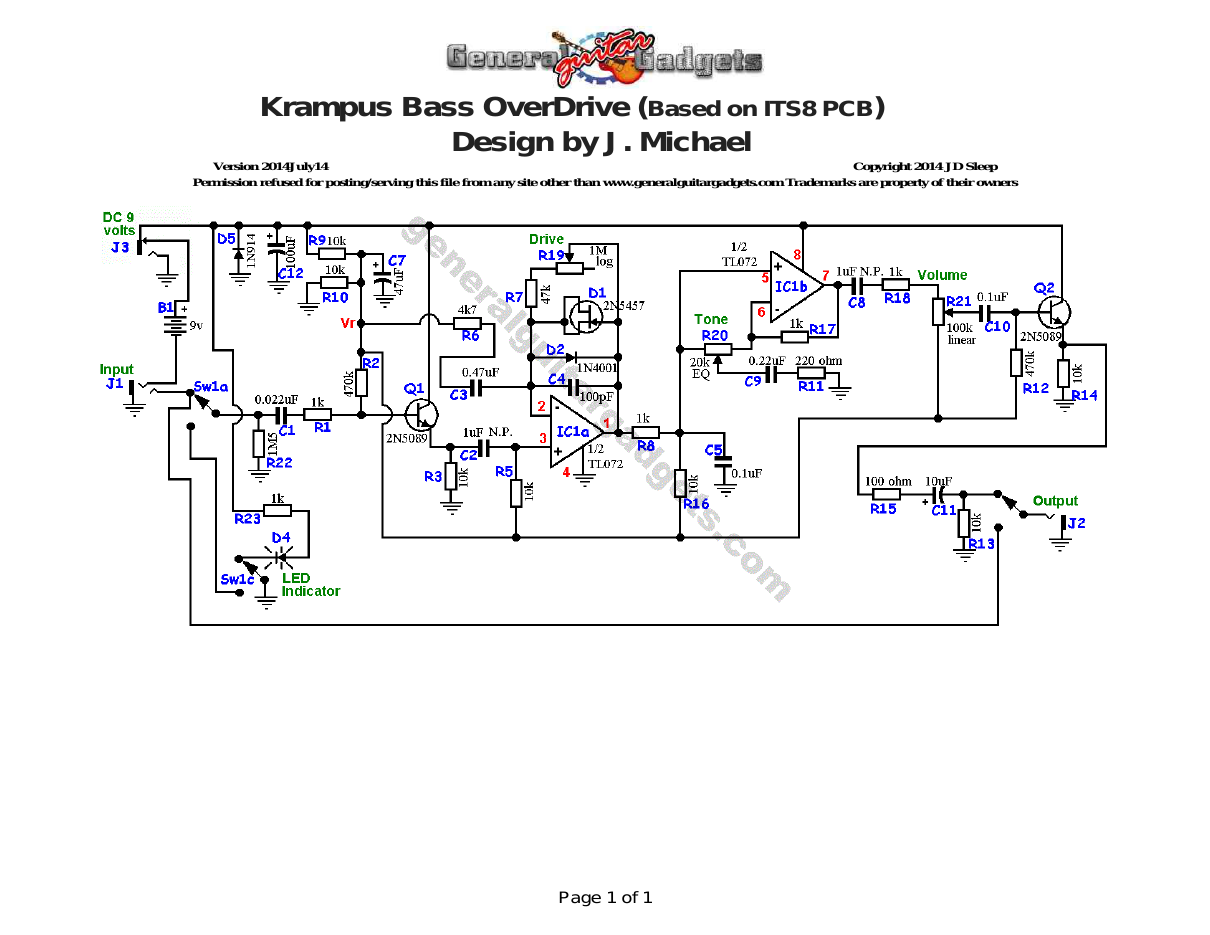
Parts layout
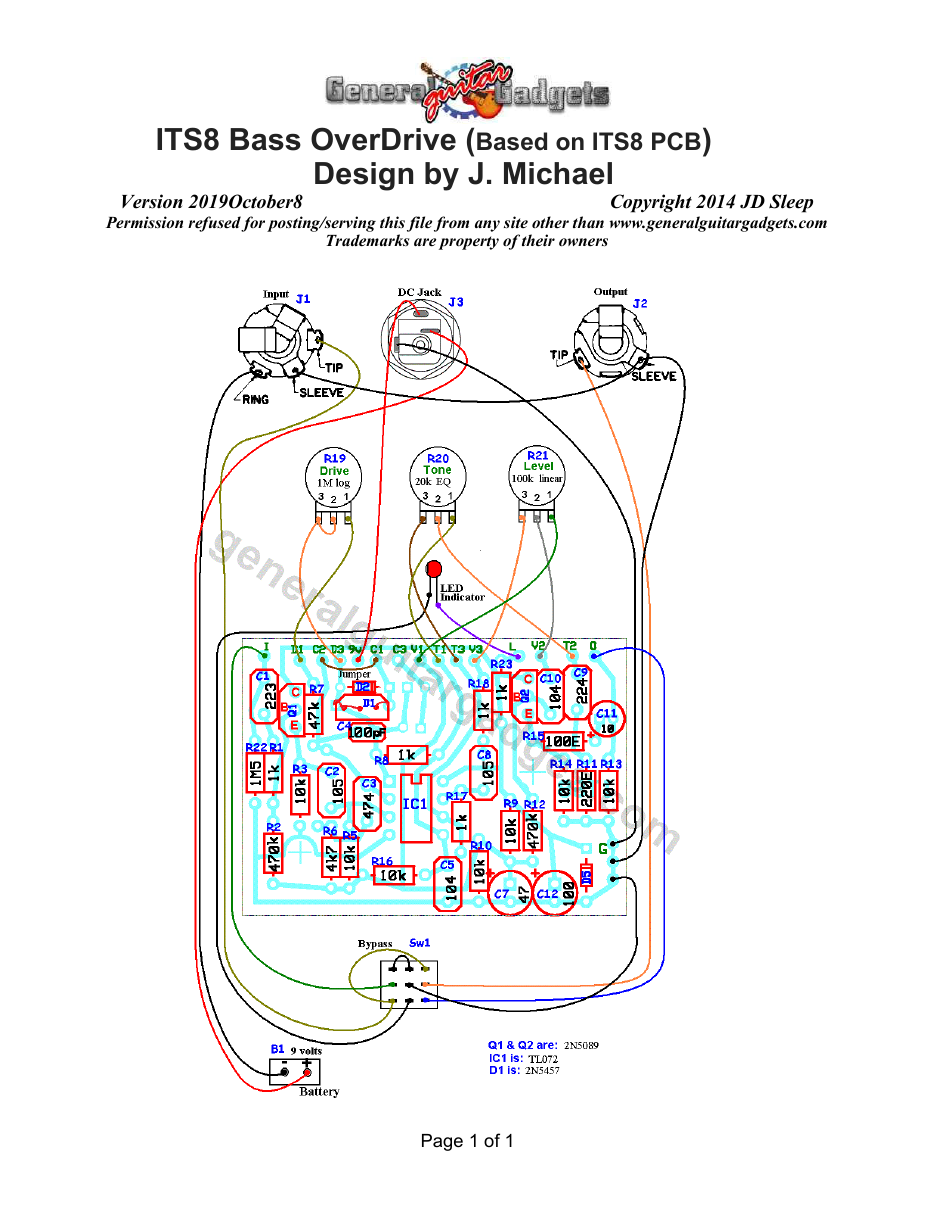
Parts Layout / Wiring Diagram
What you will need
Bill of Materials
Version 2014July11 · Copyright 2014 JD Sleep · Permission refused for posting/serving this file from any site other than www.generalguitargadgets.com · Trademarks are property of their owners
Resistors
| Resistor ID | Value | 3-band Marking | 4-band Marking |
|---|---|---|---|
| R1 | 1k | brown-black-red | brown-black-black-brown |
| R2 | 470k | yellow-violet-yellow | yellow-violet-black-orange |
| R3 | 10k | brown-black-orange | brown-black-black-red |
| R4 | None | ||
| R5 | 10k | brown-black-orange | brown-black-black-red |
| R6 | 4k7 (4.7k) | yellow-violet-red | yellow-violet-black-brown |
| R7 | 47k | yellow-violet-orange | yellow-violet-black-red |
| R8 | 1k | brown-black-red | brown-black-black-brown |
| R9 | 10k | brown-black-orange | brown-black-black-red |
| R10 | 10k | brown-black-orange | brown-black-black-red |
| R11 | 220 ohm | red-red-brown | red-red-black-black |
| R12 | 470k | yellow-violet-yellow | yellow-violet-black-orange |
| R13 | 10k | brown-black-orange | brown-black-black-red |
| R14 | 10k | brown-black-orange | brown-black-black-red |
| R15 | 100 ohm | brown-black-brown | brown-black-black-black |
| R16 | 10k | brown-black-orange | brown-black-black-red |
| R17 | 1k | brown-black-red | brown-black-black-brown |
| R18 | 1k | brown-black-red | brown-black-black-brown |
| R22 | 1M5 (1.5M) | brown-green-green | brown-green-black-yellow |
| R23 | 1k | brown-black-red | brown-black-black-brown |
Capacitors
| Capacitor ID | Value | Type | Possible Marking |
|---|---|---|---|
| C1 | 0.022µF | Film | 223 |
| C2 | 1µF | Film | 105 |
| C3 | 0.47µF | Film | 474 |
| C4 | 100pF | Ceramic or Film | 101 |
| C5 | 0.1µF | Film | 104 |
| C6 | none | ||
| C7 | 47µF | Aluminum Electrolytic | 47uF |
| C8 | 1µF | Film | 105 |
| C9 | 0.22µF | Film | 224 |
| C10 | 0.1µF | Film | 104 |
| C11 | 10µF | Aluminum Electrolytic | 10uF |
| C12 | 100µF | Aluminum Electrolytic | 100uF |
Potentiometers
| Part ID | Value | Type |
|---|---|---|
| R19 - Drive Control | 1M | Log (or Audio) Taper |
| R20 - Tone Control | 20k | EQ Taper (or substitute 25k linear) |
| R21 - Level Control | 100k | Linear Taper |
Other
| Part ID | Part Name |
|---|---|
| IC1 | TL072 |
| D1 | 2N5457 JFET |
| D2 | 1N4001 |
| D5 | 1N914 |
| Q1 | 2N5089 |
| Q2 | 2N5089 |
| J1 | Stereo quarter-inch jack |
| J2 | Mono quarter-inch jack |
| J3 | DC Jack |
| B1 | 9 volt battery (not included in the Kit) |
| Sw1 Examples of other NPN bipolar junction transistors: ● 2SC1815 (original) – Has a different Pin format than the PCB uses ● 2N3904 ● 2N4401 ● 2N5088 ● MPSA18 ● many others | Heavy Duty 3PDT foot switch 9v battery snap, Printed Circuit Board, 24 gauge stranded wire, Enclosure, Knobs |
How to build it
Instructions
Version 2014July25 · Copyright 2014 JD Sleep · Permission refused for posting/serving this file from any site other than www.generalguitargadgets.com · Trademarks are property of their owners
This is the Krampus Bass Overdrive. Use the project documents provided, starting with the General Build Instructions. You will need to solder 2 legs of a JFET clipper together in then install that as your D1 clipping device. See the “Technical Help” “Building Kits” Pages for more information on this. D5 is optional, it is there to prevent reverse polarity power from destroying the IC. If you decide not to install D5, do not put a jumper in place of D5, just leave it blank. C12 is a power supply filter cap and is also somewhat optional. If you plan on only using battery power, you probably don't need C12. Again, if you don't install C12, do not install a jumper, leave it blank. If you have D5 installed and you do ever zap the unit with reverse power, hopefully all you have to do to fix it is replace or remove D5. Here's an inside view of the unit we built to show our construction details. Here is a chart of voltages taken at the IC and transistor pins. This information can be used to help you find and fix problems if your ITS8 doesn't work when you test it. The voltages are approximate, you may not get these exact readings, but they should be somewhere close.
Component
Location
9 volt power supply IC
Q1
Voltage
9.4v
IC Pin 1
4.7v
IC Pin 2
4.8v
IC Pin 3
4.7v
IC Pin 4
0v
IC Pin 5
4.7v
IC Pin 6
4.7v
IC Pin 7
4.7v
IC Pin 8
9.4v
Collector
9.4v
Base
4.2v
Q2
Emitter
3.9v
Collector
9.4v
Base
4.2v
Emitter
3.9v
Comments and questions are welcome and can be sent to [email protected]
More about this project
Notes, sounds and related links
Krampus Sound Sample


Ready to build? We have the kit.
Buy a Krampus Complete Kit. Includes all the parts and materials you need to build one, all for about the price you would pay for a PCB and parts.
Would you like a Ready to Solder Circuit Board for this project? Note: If you buy the kit, the Ready-to-Solder Printed Circuit Board (RTS PCB) is included in the kit. You do not need to purchase this Ready to Solder Circuit Printed Board if you buy the kit.