
Project · Compression
Dan Armstrong™ Orange Squeezer™
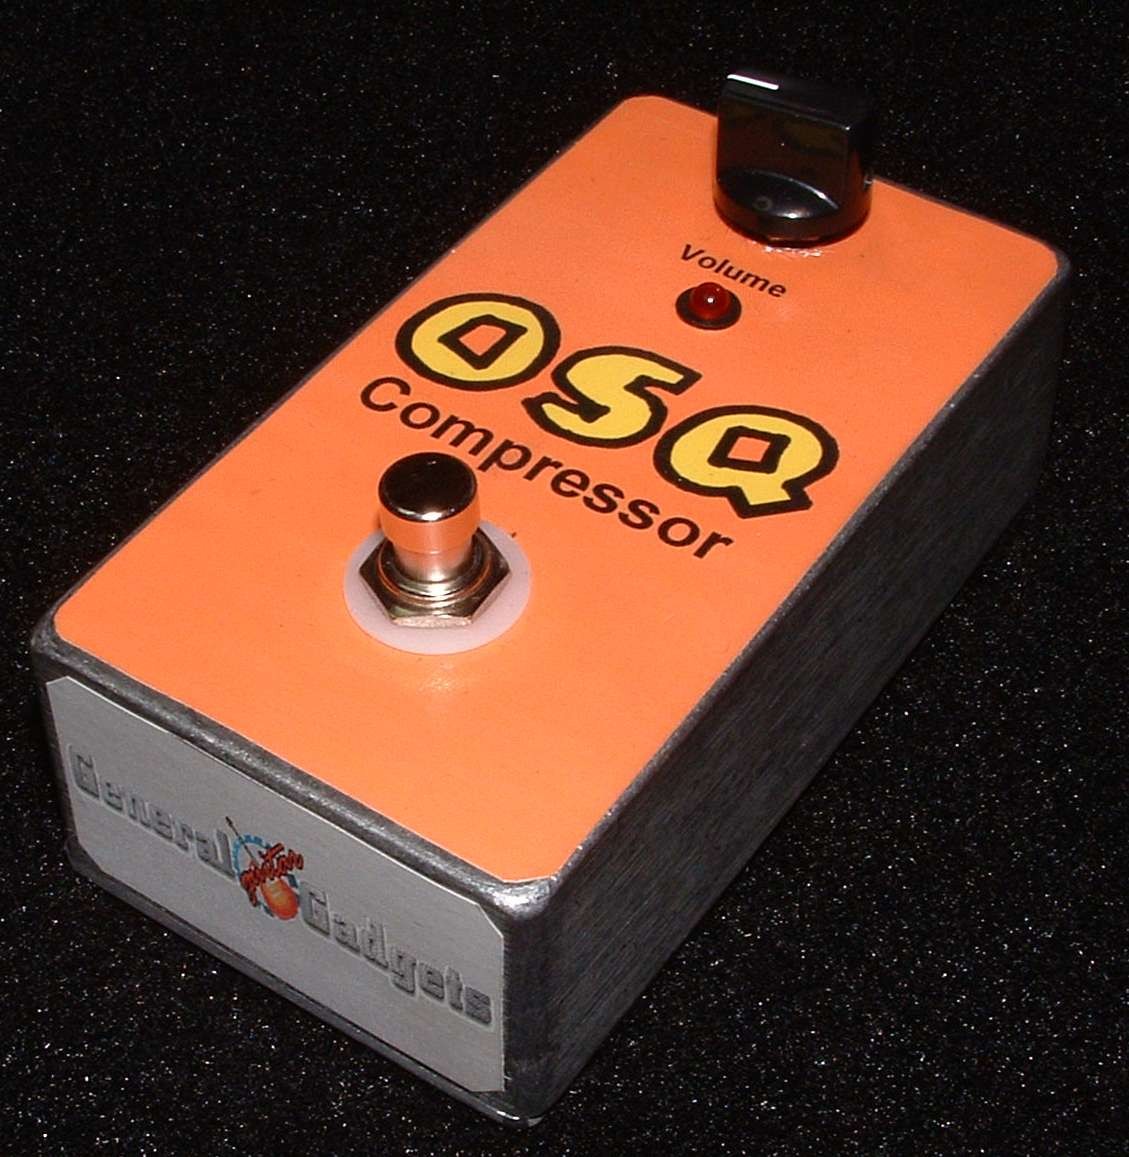
The OSQ is a stompbox replica of the Dan Armstrong™ Orange Squeezer™, the little plug-in compressor behind Mark Knopfler's Sultans of Swing tone and the Doobie Brothers' Takin' It to the Streets. The complete kit is $44 with every part including the germanium diode and 2N5457 JFETs the circuit depends on; the free schematic, both wiring layouts and the original Dan Armstrong™ schematic are below.
The Orange Squeezer™ is an excellent little compressor and easy to build too. The original unit plugged directly into your guitar. We have updated this to the standard stompbox format. According to stompbox folklore, Mark Knopfler (Dire Straits) and Jeff "Skunk" Baxter (Steeley Dan, Doobie Brothers, Studio player) used this compressor. You can certainly hear some excellent compressed guitar playing on the Dire Straits song "Sultans of Swing" and Baxter's solos on the Doobie Brothers "Takin' It To The Streets" album (see youtube video at the bottom of the page).
The story
About the circuit
The Orange Squeezer™ was the compressor in Dan Armstrong™'s early-'70s line of plug-in effects, a small orange box that hung off the guitar's output jack with a single volume trimmer inside. It uses a JFET as the gain element and a germanium diode in the control path, and it squashes the signal gently and quickly, in a way that flatters picked chords and clean single-note lines. Mark Knopfler's clean tone on "Sultans of Swing" and Jeff "Skunk" Baxter's solos with the Doobie Brothers are the usual references, and both players have been linked to the Orange Squeezer™ for decades.
This project at GGG
JD added the Orange Squeezer™ in March 2001, converted to a normal stompbox with an input and output jack, and it became the project where he worked out the detailed, step-by-step build instructions that every GGG project has used since. The kit includes the germanium diode and 2N5457 JFETs the circuit depends on, and the page carries two wiring layouts, one with the volume control on the panel, along with the original Dan Armstrong™ schematic for reference.
Project files
Everything you need to build it
Orange Squeezer™ Ready-For-Transfer Printed Circuit Board Layout For use only if you are a complete DIY person who wants to etch and drill your own PCB. Otherwise, we recommend you ignore this PCB mask and buy the Ready to Solder Printed Circuit Board or Complete Kit.
Schematic
Schematic
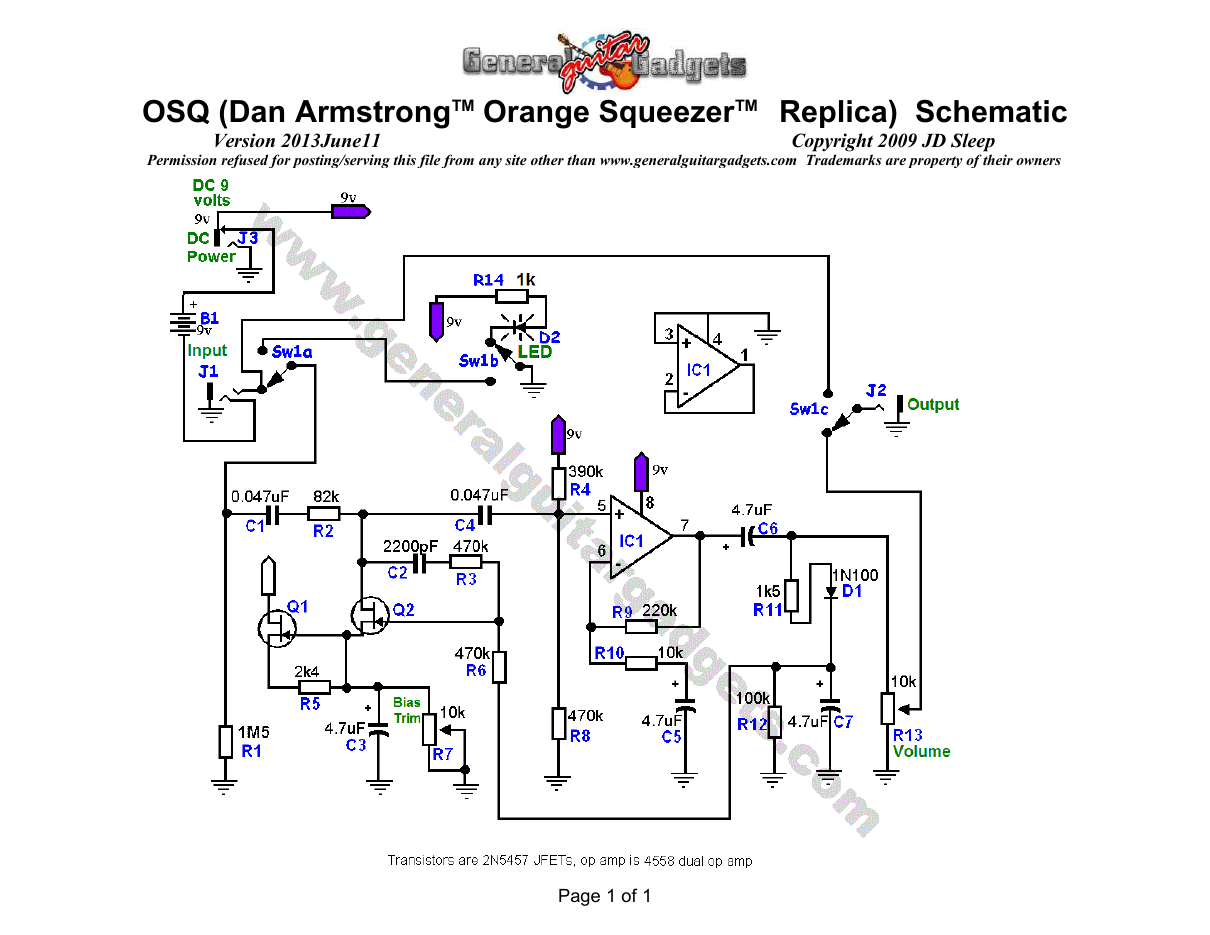
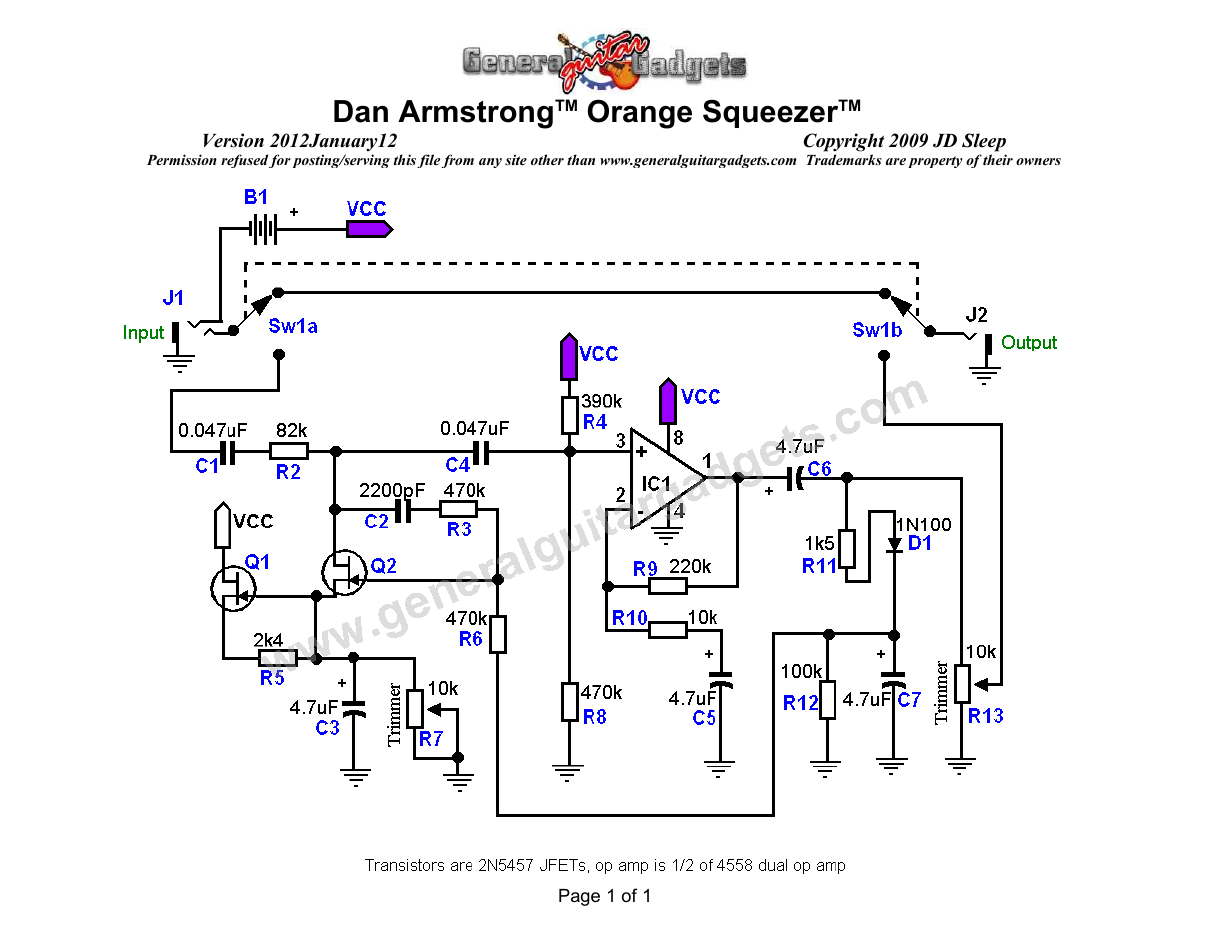
Parts layout
Parts Layout / Wiring Diagram
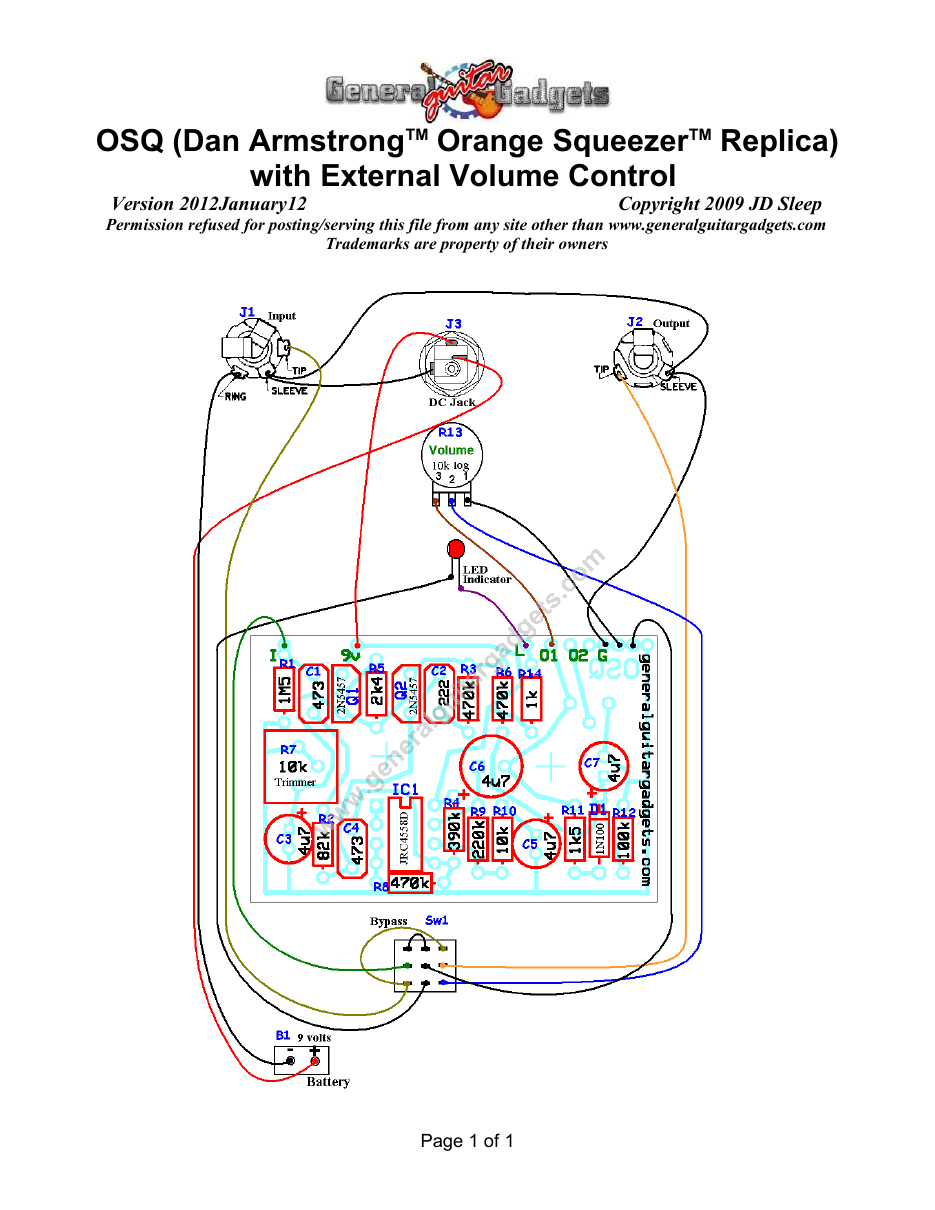
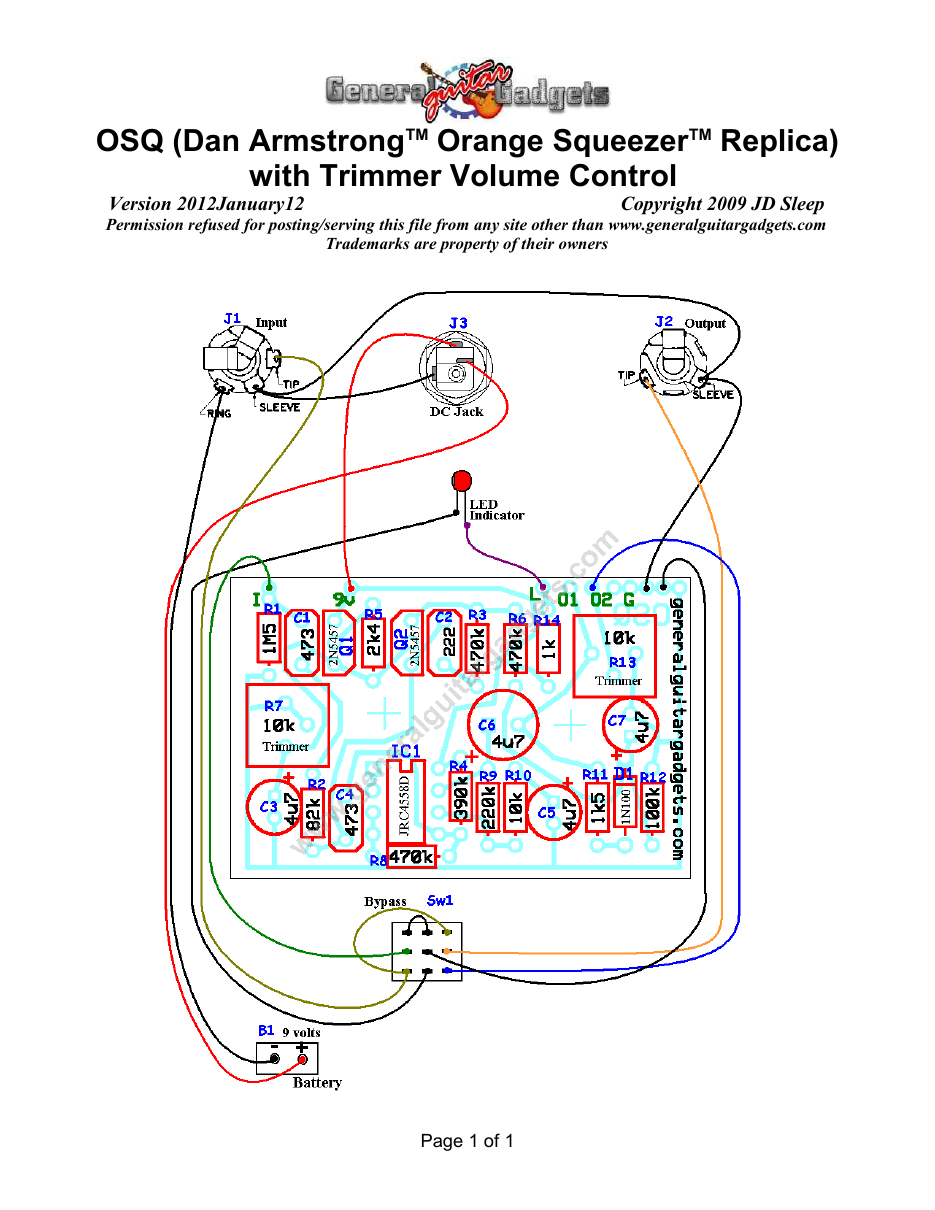
What you will need
Bill of Materials
Version 2009May26 · Copyright 2006 JD Sleep · Permission refused for posting/serving this file from any site other than www.generalguitargadgets.com · Trademarks are property of their owners
Resistors
| Resistor ID | Value | 3-band Marking | 4-band Marking |
|---|---|---|---|
| R1 | 1M5 | brown-green-green | brown-green-black-yellow |
| R2 | 82k | gray-red-orange | gray-red-black-red |
| R3 | 470k | yellow-violet-yellow | yellow-violet-black-orange |
| R4 | 390k | orange-white-yellow | orange-white-black-orange |
| R5 | 2k4 (2.4k) | red-yellow-red | red-yellow-black-brown |
| R6 | 470k | yellow-violet-yellow | yellow-violet-black-orange |
| R8 | 470k | yellow-violet-yellow | yellow-violet-black-orange |
| R9 | 220k | red-red-yellow | red-red-black-orange |
| R10 | 10k | brown-black-orange | brown-black-black-red |
| R11 | 1k5 (1.5k) | brown-green-red | brown-green-black-brown |
| R12 | 100k | brown-black-yellow | brown-black-black-orange |
| R14 | 1k | brown-black-red | brown-black-black-brown |
Capacitors
| Capacitor ID | Value | Type | Possible Marking |
|---|---|---|---|
| C1 | 0.047µF | Film | 473 |
| C2 | 0.0022µF (2200pF) | Film | 222 |
| C3 | 4.7µF | Tantalum or Aluminum Electrolytic | 4.7µF |
| C4 | 0.047µF | Film | 473 |
| C5 | 4.7µF | Tantalum or Aluminum Electrolytic | 4.7µF |
| C6 | 4.7µF | Tantalum or Aluminum Electrolytic | 4.7µF |
| C7 | 4.7µF | Tantalum or Aluminum Electrolytic | 4.7µF |
Potentiometers
| Part ID | Value | Type |
|---|---|---|
| R7 - Bias Trim | 10k | Trimmer |
| R13 - Volume Control | 10k | Trimmer (original) or Log (Audio) Taper Potentiometer |
Other
| Part ID | Part Name |
|---|---|
| IC1 | JRC4558D Dual Opamp |
| Q1 | 2N5457 JFET Transistor |
| Q2 | 2N5457 JFET Transistor |
| D1 | 1N100 (germanium diode) |
| D2 | Status Indicator LED and holder |
| J1 | Stereo quarter-inch jack |
| J2 | Mono quarter-inch jack |
| J3 | DC Jack |
| B1 | 9 volt battery (not included in the Kit) |
| Sw1 | Heavy Duty 3PDT foot switch 9v battery snap, Printed Circuit Board, 24 gauge stranded wire, Enclosure, Knobs |
How to build it
Instructions
Version 2007June12 · Copyright 2006 JD Sleep · Permission refused for posting/serving this file from any site other than www.generalguitargadgets.com · Trademarks are property of their owners
This is a replica of the Dan ArmstrongTM Orange SqueezerTM Compressor referred to as OSQ in these documents. This Compressor doesn't have all the controls of some of the other compressors, but it's got a very nice compression sound that is not completely attainable from the others. Use the project documents provided, starting with the General Build Instructions. You should use the 2N5457 JFETs, you may be able to get it to sound good with other JFETs, but, we haven't personally found any good substitutes that sound as good. D1 is a 1N100 germanium diode. You can substitute other germanium diodes for the 1N100, but not silicon, it must be germanium unless you make some alterations to the circuit. Be very careful installing the 1N100, it has a glass case and is very fragile. Bend the leds with as little pressure as possible. The original unit used a JRC4558D dual op amp IC, only half of the op amp is used. It may be possible to get a detectable audible quality improvement using different op amps, but we stuck with the original IC. The sound difference between tantalum capacitors and aluminum electrolytic capacitors is very subtle, if even at all detectable to the ear. You would most likely not hearing any difference. It's also debatable which type of capacitor would sound better if you could hear the difference. The quality of aluminum electrolytic capacitors has improved greatly since this unit was designed. We use high quality aluminum electrolytic capacitors.
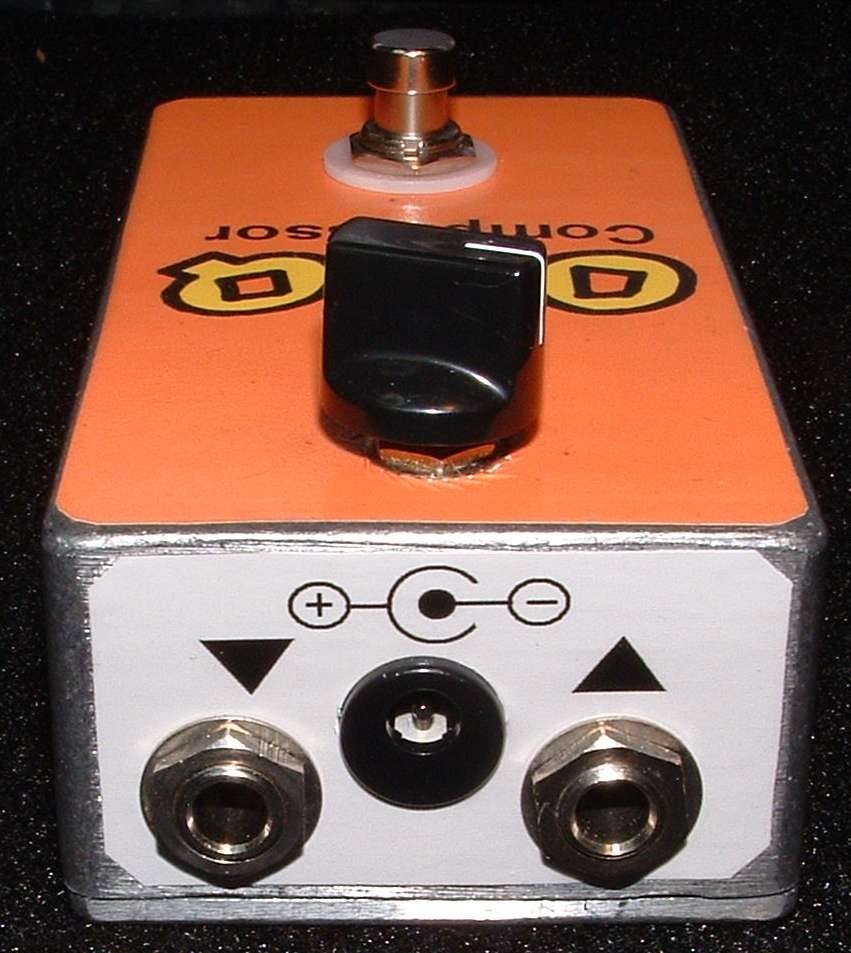
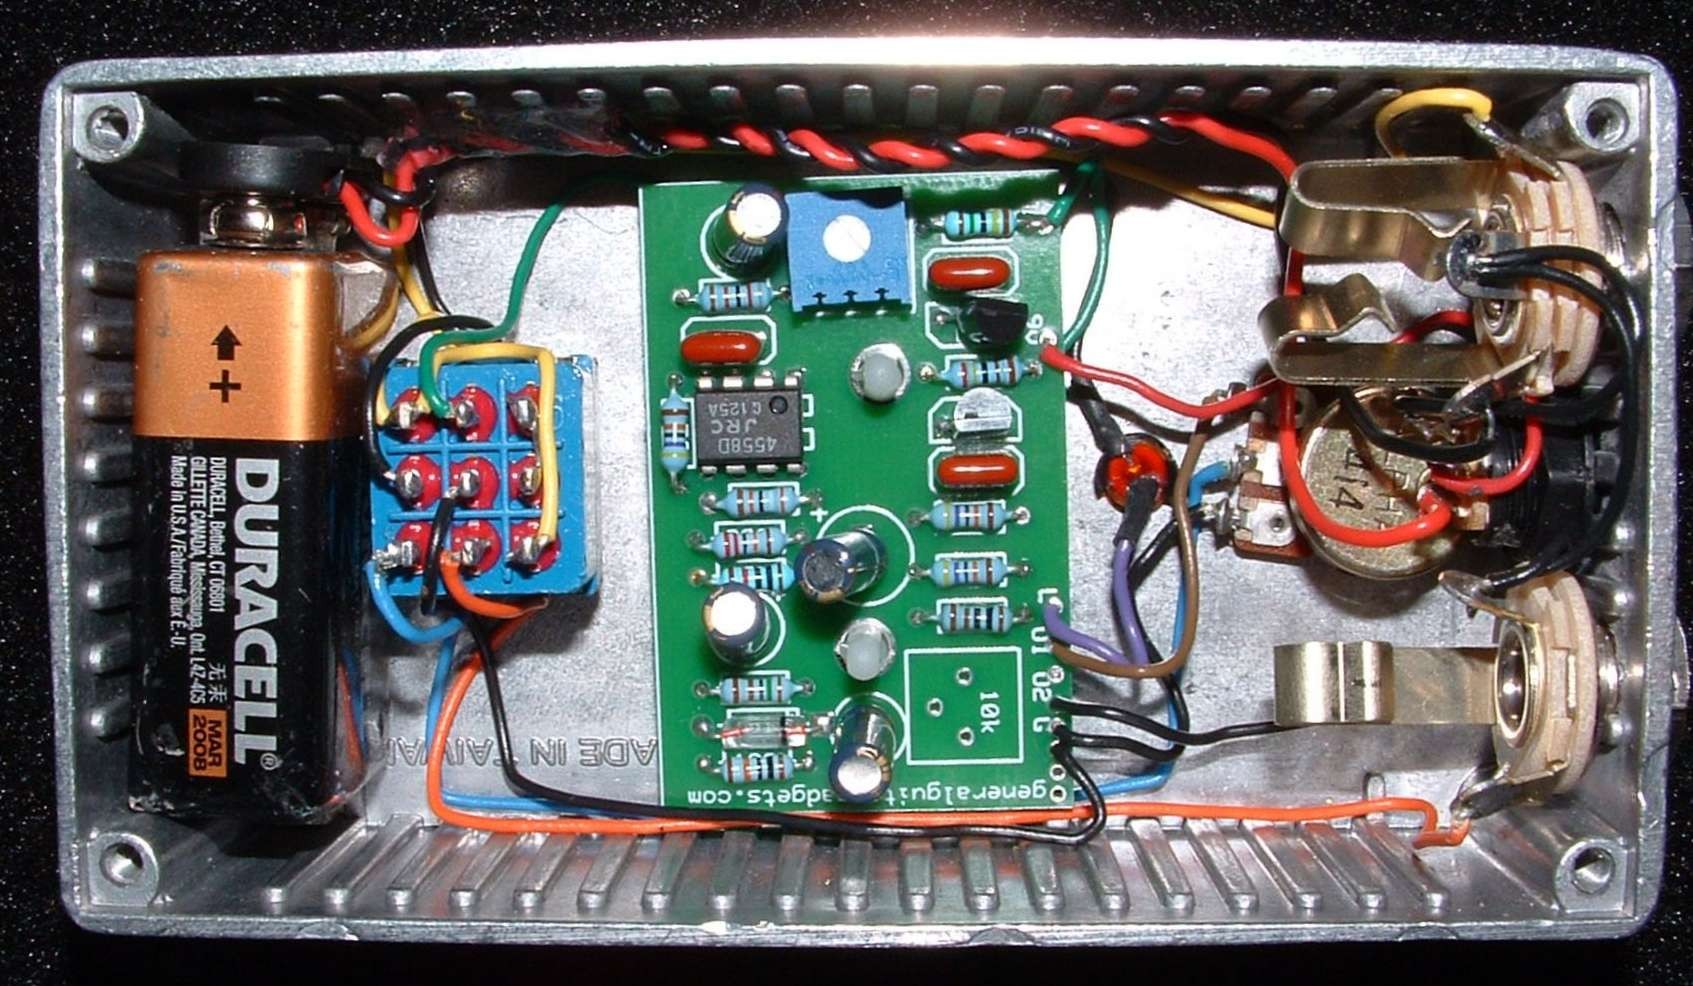
There are two output pads on the PCB labeled O1 and O2. If you build with a external volume control, use O1 for the wire to the potentiometer. If you use a trimmer volume control, use O2 pad for the wire to the foot switch. When your unit is built, adjust the "Bias" trimmer by turning it counter-clockwise until the sound dies, then turn it slowly clockwise until you get the best sounding compression. Turning too far will lead to distortion. Here's an inside view of the unit we built to give you some general ideas if needed.
Comments and questions are welcome and can be sent to [email protected] Here is a chart of voltages taken at the transistor and IC pins. This information can be used to help find and fix problems if your OSQ doesn't work when you test it.
Component
Location
9 volt power supply Q1
Q2
IC1
Voltage
8.8
Gate
2.4
Source
4.0
Drain
8.8
Gate
0.6
Source
2.6
Drain
2.1 to 2.6
Pin 1
8.3
Pin 2
8.3
Pin 3
0
Pin 4
0
Pin 5
4.7
Pin 6
4.8
Pin 7
4.8
Pin 8
8.8
Questions
Frequently asked questions
What does it sound like?
Gentle, musical squash with a touch of sparkle, more Nashville-clean than a Dynacomp™. It evens out picking and adds sustain without an obvious pumping effect.
How do I set the trimmer?
Turn R7 fully counter-clockwise until the sound dies, then turn it slowly clockwise to the point of best compression. Past that it distorts.
Can I use a silicon diode?
No. D1 must be germanium (1N100 or similar); it sets the compression threshold and silicon changes the behaviour.
Volume knob or trimmer?
Either: the layouts show an external volume pot or an internal trimmer. Most builders fit the pot.
More about this project
Notes, sounds and related links


Check out the lead guitar at 1:50 into the song for Orange Squeezer™ type compression. It is known that Skunk Baxter sometimes used an Orange Squeezer™ compressor. I don't know if this is it, but it sounds very much like the Orange Squeezer™ sound.
Ready to build? We have the kit.
Buy a OSQ Complete Kit. Includes all the parts and materials you need to build one, including the PCB, all for about the price you would pay for a PCB and parts.
Would you like a Ready to Solder Circuit Board for this project? Note: If you buy the kit, the Ready-to-Solder Printed Circuit Board (RTS PCB) is included in the kit. You do not need to purchase this Ready to Solder Circuit Printed Board if you buy the kit.